

Showing posts with label The Parsonage. Show all posts
Showing posts with label The Parsonage. Show all posts
Tuesday, December 31, 2013
2013 REVIEW AT THRIFTY PARSONAGE LIVING
It's hard to believe that 2013 is already coming to a close. With the new year right around the corner, it has us looking back at what the years has held. Below you will find a collection of events and projects that have happened at Thrifty Parsonage Living.

Saturday, July 6, 2013
DIY BATHROOM MAKEOVER
Since our move in February, I've been working fast and furious at getting everything unpacked, and started right into painting projects. I wanted our home to be ready for all the guests coming for our son's wedding. In spite of my best efforts to have everything done before the wedding, however, there was still a half bath that needed some TLC. Since I was missing our children and grandchildren, I thought a little project would help get my mind off of missing them.

Our half bath was the perfect project.

Our half bath was the perfect project.
Wednesday, April 3, 2013
LET THE CONSTRUCTION BEGIN
The old saying it has to get worse to get better is true for our home. The construction or should I say destruction has begun.

They have begun the removal of the siding and take out the old windows.

They have begun the removal of the siding and take out the old windows.
Monday, March 18, 2013
HOME TOUR OF THE PARSONAGE {part 2}
Today I'd like to continue with the tour of our new home/parsonage. Last week I showed you the living room, dining room and kitchen. Today I'll show you the bedrooms. First I'll take you down the hall to view three of the bedrooms.
The hallway to the bedrooms is just off of the dining room. The same paint color and stencil design (only minus the berries and leaves) from the kitchen and dining room continues down the hallway. The first door on the left is a linen closet and the door on the right is to the main bathroom. The next two doors on the right are bedrooms and on the far left is the master bedroom. The hallway and bedrooms have hardwood floors. The hallway floor has been refinished, but the bedrooms floors need refinishing. They are on our to do list for this summer.

The first bedroom on the right is the smallest of the bedrooms and had wallpaper on the lower half of the walls along with a boarder.
Thursday, January 24, 2013
MOVING TIPS (part 3)
Here are just a few more trips to help make your move a little less stressful.
Relocation Reminders
(I have this in my moving binder.)
Change of address forms sent to post office.
Change of address to all subscribed papers and magazines
Transfer insurance policies or set up new ones before leaving.
Notify electric, water, gas and phone companies when to discontinue your service.
Children's school records
Doctor and Dental records
Children's school records
Doctor and Dental records
Pack a box with first arrival essentials.
(When our daughter went off to school , I told here she needed one of
these boxes.
She thought it was a bit silly, but thanked me for it
later!)
Light bulbs and flashlight
Medicine,
Shampoo and soap
Trash bag
Towels
Toilet Paper
Paper plates and cups along with plastic silverware
Basic tools - hammer, pliers, screwdriver
Paper towels and napkins
First aid items
Make sure this box is in an area in the truck that will be taken off first, and placed in an area that is easily accessible.
 (Here's my arrival box that I've started to pack.)

Monday, January 21, 2013
TIPS FOR MOVING (part 2)
In my last post Tips For Moving , I covered making a moving binder and packing essentials . Today I'll be adding a few more tips. We have always done all of our own moves, and never had the privilege of having professional movers do the job for us. The tips I'm giving are what I've learned doing our own moves and could be different if you are dealing with a moving company.

3. Pack efficiently.
-Try to pack one room at a time placing items for the room in clearly marked boxes. If you mix things from different rooms in one box it makes for mass confusion when unpacking.
-Make sure all the items you're packing are clean and or laundered.
-Place sheets for bedrooms in a dresser drawer . This makes it easy to find the bedding when you are setting up the beds.
-Use suitcases to pack extra clothing to save space.
-Fill every available space - we have packed clothing in our freezer. Dishtowels in our microwave and light weight items in the washer and dryer.
- Do not pack items that are combustible. If packing liquids such as laundry soap, place it in a plastic bag and then in a plastic tub with a lid. If the liquid leaks it will not be running over all your other items in the moving truck. When moving in the winter time and cold weather, I don't pack any of the liquid items just to avoid any items freezing.
4. Label Each Box Well
Place a label on each box and at the top of the label write which room it is for.
Under the room name include some of the main contents in the box,
marking fragile items clearly. ( I mark FRAGILE in red).

-I used recipe cards and self stick labels for marking our boxes.
Thursday, January 17, 2013
TIPS FOR MOVING
Hi everyone! I'm planning to share a few post over the next few days on moving tips. My post may be a bit brief for a while because of being so busy with moving.
Keep track of everything in a binder - moving costs, estimates and an inventory of your items.
Keep a log of transfer of records - school, dental, medical records, newspapers, magazine, change of address and change of email address.
Collect boxes from grocery stores or buy them from a moving company or large stores such as Home Depot. Mattress bags or boxes are a must to prevent damage to your mattress.
We have found these items to be essential along with many rolls of packing tape and paper. We usually go to our local newspaper office and buy unprinted paper end rolls. This works great for wrapping and does not give off ink like newspapers do.
Shrink wrap and bubble wrap are also two must haves.

You can use this to wrap around mirrors, photos, and other delicate items.
Tips For Moving
# 1 Create a moving binder.
Keep a log of transfer of records - school, dental, medical records, newspapers, magazine, change of address and change of email address.
#2 If you're doing your own packing,
get the essential supplies.
We have found these items to be essential along with many rolls of packing tape and paper. We usually go to our local newspaper office and buy unprinted paper end rolls. This works great for wrapping and does not give off ink like newspapers do.
Shrink wrap and bubble wrap are also two must haves.

You can use this to wrap around mirrors, photos, and other delicate items.
Saturday, January 5, 2013
LIFE CHANGING NEWS
Happy New Year everyone!
I wanted to pop in quickly and let you know that I haven't forgotten about you completely. There are many changes taking place here at Thrifty Parsonage Living. In fact we have taken on a HUGE life changing project.
My husband has had several inquires over the past months and now has received a call to serve as pastor to another church.
Monday, December 31, 2012
LOOKING BACK AT 2012
As 2012 draws to a close, it's a great time to reflect back on what's happened and been done at the Parsonage over the past year.

Here's a little peak at some of these projects.
A few rooms received a makeover.

Monday, October 1, 2012
THE CLOSET MAKEOVER HAS BEGUN
Hi everyone, I hope you had a great weekend. Last week I told you of my plans to make over my office closet. Well, the work has begun.

Let's start off by taking a look at this crowed, cluttered closet.

In an attempt to add book storage a few years ago, a small shelf was added.

As you can see in the photo, the shelf above the basket runs only 1/4 of the way across the closet and virtually inaccessible unless you get a ladder and stick your head around the corner into the space. There were a few things that got placed on these selves but never used for anything that needed accessing. This room, along with the rest of the house, suffered from the roof leaking for 12 years before a tree fall on the roof making yet another major leak. I knew the office had water damage on the ceiling, but didn't realize what we would find when we tore into the closet. (We are thankful that the church had the roof replaced and no more leaks.)


This project is turning out to be more work than what I had anticipated, but the end results keeps me moving forward. In the mean time this is what our living room looks like with all the office and closet stuff !

Someone from the church stopped by Friday evening and asked if we were moving! Who would guess a small room could have so much stuff! My goal for this fall and winter is to purge our home, and get more organized.


Let's start off by taking a look at this crowed, cluttered closet.

In an attempt to add book storage a few years ago, a small shelf was added.

As you can see in the photo, the shelf above the basket runs only 1/4 of the way across the closet and virtually inaccessible unless you get a ladder and stick your head around the corner into the space. There were a few things that got placed on these selves but never used for anything that needed accessing. This room, along with the rest of the house, suffered from the roof leaking for 12 years before a tree fall on the roof making yet another major leak. I knew the office had water damage on the ceiling, but didn't realize what we would find when we tore into the closet. (We are thankful that the church had the roof replaced and no more leaks.)
This is what we found.

Gross mold ! Out came my rubber gloves, mask and a bucket of hot bleach water, and the cleaning began. The tape in the corners of the closet was letting loose as well. I tore this off and my handy husband re-taped the dry wall. At the same time, he made the door opening larger to fit a standard 4 foot bi-fold door. Any of you who have done dry wall taping know the process of mudding, sanding, more mudding, sanding and loads of DUST!


This project is turning out to be more work than what I had anticipated, but the end results keeps me moving forward. In the mean time this is what our living room looks like with all the office and closet stuff !

Thursday, September 6, 2012
FALL DECORATING - ROOM BY ROOM
It's hard to believe that we're seeing the end of summer and fall fast approaching. We didn't feel official summer until after the 4th of July. The joke around here was that we had June-uary, because of all the cold wet weather. We are now enjoying beautiful weather, but fall is definitely in the air with the crisp cool nights and a nip in the air most mornings.
That being said, I think it's time to start some fall house cleaning and bringing out my fall decorations. I'm planning on doing this room by room; and while doing this I'll share the fall decor I've added to each room.
Today I'll begin with the dinning room. Of course, the decorating is done on a limited budget, but that doesn't mean you can't add a few new things. For the table decor, I began by placing a garage sale table runner down that I've had for a few years already. I then added a candle stick that my husband made years ago. I then placed a 49 cent thrift store candle on it and flanked it with two vertical wheat bundles. The wheat bundles were found at my local thrift store last week for 99 cents each. I love to know how much I've saved by purchasing second hand items, so I did an on line search for these and I found some similar ones for $ 59.98 each. That makes for a $119.96 savings and one thrifty find!

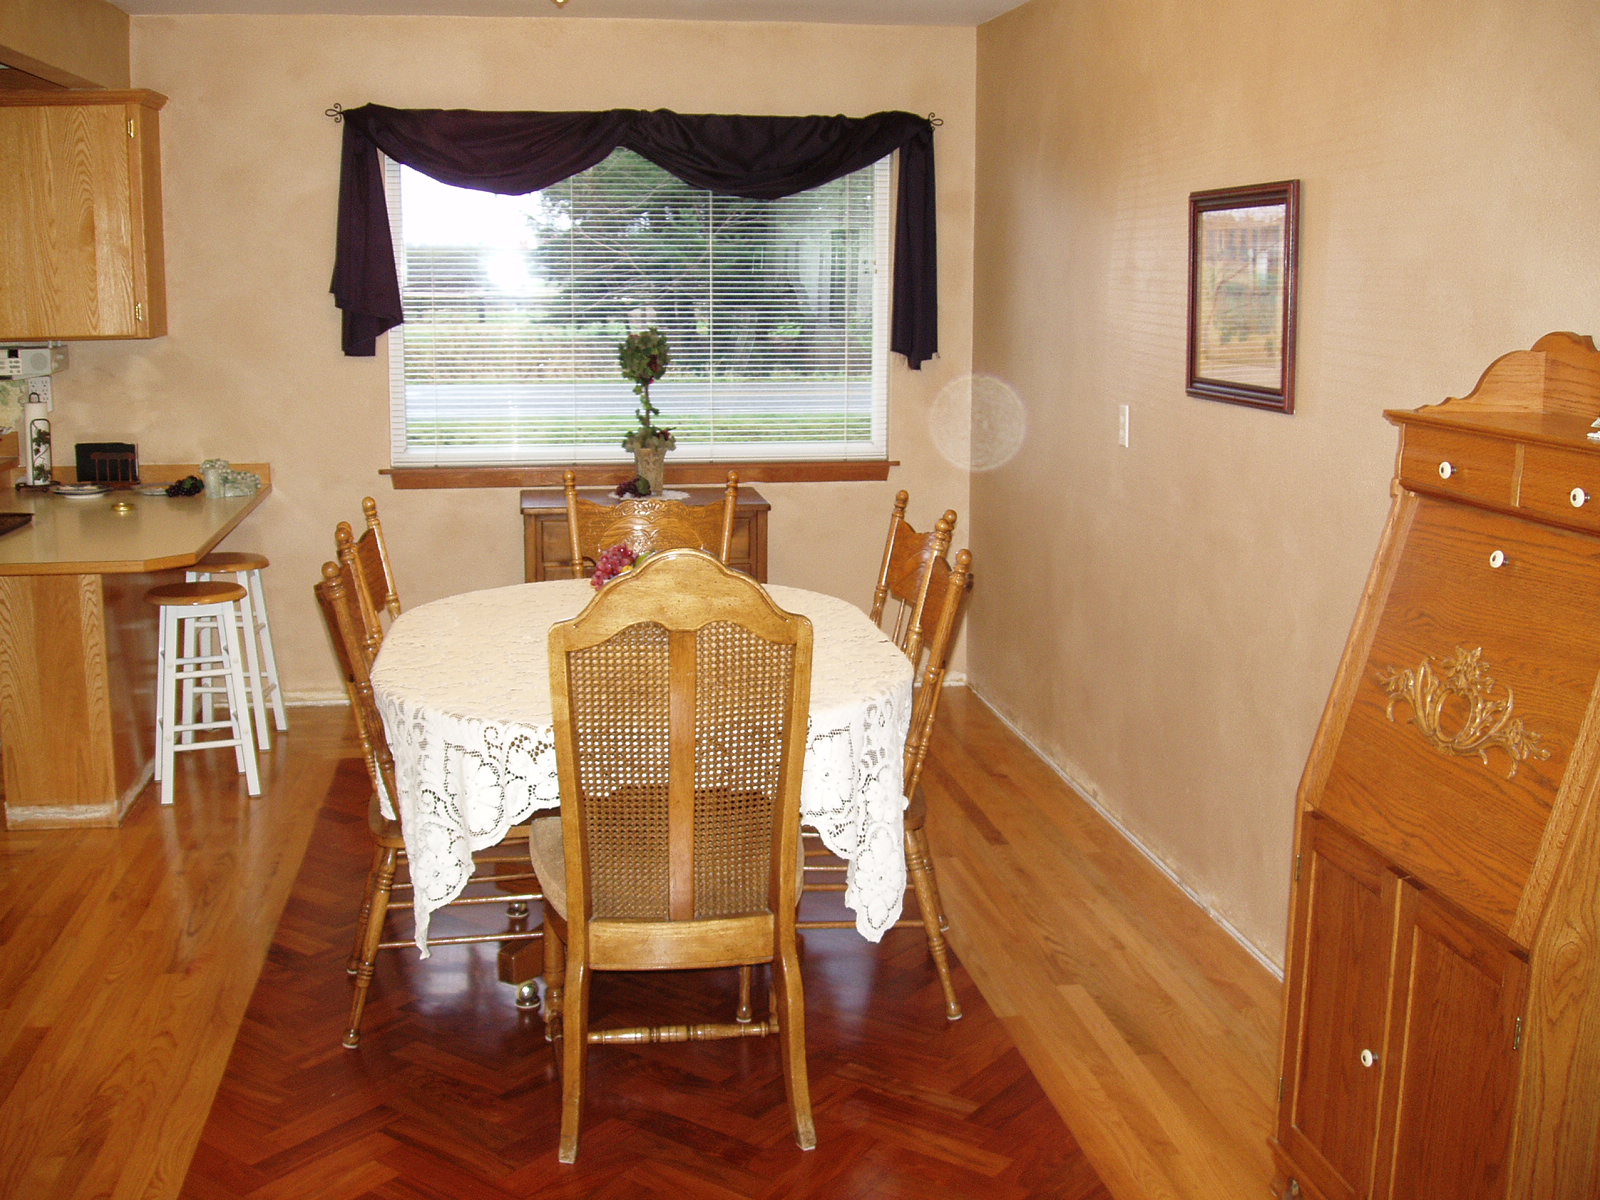
View of the dinning area taken from the kitchen.


You may also enjoy seeing my fall decor from previous years.

You'll want to come back and read my next post as I'll be sharing a tutorial -
DIY budget friendly wall art.
Have a great day!
Thursday, August 16, 2012
BATHROOM MAKEOVER & PAINTING PLASTIC WALLS
Back in April of 2010, when I first started this blog. I shared my bathroom makeover for under $500. I actually think it was done for quite a bit less, but we did the makeover shortly before I started this blog. I didn't write down the exact amounts we spent on finishing the room.

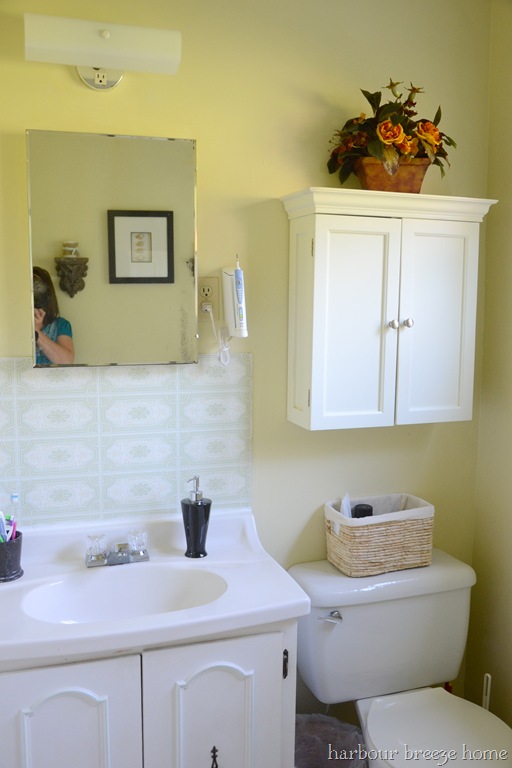
Rita from Harbour Breeze Home recently asked me a question regarding this makeover. She is planning a bathroom makeover also. As you can see in the photo below, her bathroom is same floor plan as ours. Even the retro light fixture is the same fixture we had before our makeover.

While looking back at the post I realized I hadn't shown you somethings I did in this room.

See the area directly above the shower stall. It used to be a solid wall of beige plastic with a seam about 18 inches from the ceiling. I came up with a thrifty fast solution to get rid of the wall of beige plastic.
Here's what I did ~
First I scrubbed the wall very well. I then ruffed the surface a bit using sandpaper. The next thing to do was add a coat of primer. After the primer was completely dry, I just painted it with latex paint. My husband then added crown molding that he made using salvaged lumber.
We use the shower in this bathroom and I wondered how it would hold up. It's been on the wall for four years and still looks like the day I painted it.

At the time of the remodel we also added a curved curtain rod. It's a little trick you can do to add more space to a small shower area. My thrifty finds ~ 99 cent Goodwill rings and a 50 cent garage sale shower curtain help hide the remainder of the ugly beige shower surround.


Rita from Harbour Breeze Home recently asked me a question regarding this makeover. She is planning a bathroom makeover also. As you can see in the photo below, her bathroom is same floor plan as ours. Even the retro light fixture is the same fixture we had before our makeover.
While looking back at the post I realized I hadn't shown you somethings I did in this room.

See the area directly above the shower stall. It used to be a solid wall of beige plastic with a seam about 18 inches from the ceiling. I came up with a thrifty fast solution to get rid of the wall of beige plastic.
PAINT
First I scrubbed the wall very well. I then ruffed the surface a bit using sandpaper. The next thing to do was add a coat of primer. After the primer was completely dry, I just painted it with latex paint. My husband then added crown molding that he made using salvaged lumber.
We use the shower in this bathroom and I wondered how it would hold up. It's been on the wall for four years and still looks like the day I painted it.


Have a great day!
Tuesday, May 15, 2012
ACCESSORIZING THE KITCHEN ON A LIMITED BUDGET

The fun part of making over a room is adding the accessories. It's like the frosting on a cake. In my last post, I shared my kitchen makeover. Today I'll continue to show you how I accessorized my kitchen on a small budget. The accent colors I chose were white with touches of yellow.

For me, the process starts several months before the makeover begins. I create a mood-board with ideas and inspirations. Pinterest is also a great place to get ideas. I then begin to watch for items at garage sales, thrift stores and in the clearance section in stores.
The items above were all purchased while thrift store shopping. I place the collected items in box, and pull them out as I decorate.

Here's an example of how I use these items. The canisters I found at Goodwill and the metal coffee wall art was from a garage sale last summer. The utensil holder is a vase left over from our daughter's wedding. It was bought 1/2 price at Micheal's.

The napkin holder and napkins were purchased from a garage sale for .25 cents each. They were both brand new and still in the package! The napkins I had tucked away in a drawer. I had forgotten about them, and was excited to find them when I needed a little more yellow as an accent.


The accents above the cabinets were all second hand items with the exception of the little chicks on the left and the plate on the lower right. I bought the plate at the dollar store a few years ago. The chicks I bought new at a hardware store (2.99) to add to my spring decor this year.

Wanting white accents, I took this thrift store chicken and spray painted it white. Spray paint is a thrifty girl's best friend!


I also shopped the house for things I already had. My diy monogram plate worked perfect in the space. One new purchase for the room was letters spelling out - EAT - purchased, of course, for 1/2 price at Michale's. A funny little lesson learned - I placed the EAT letters neatly above the cabinets and thought it looked great until my children came home and said "Mom, why do you have a FAT sign in the kitchen?" I had hadn't noticed that the lip on the cabinet hid the bottom the E and it looked like FAT. I guess it would be a good reminder for me to stick to my diet, but decided to add a few block to raise it up and spell the word EAT as I had originally planned.

Above the refrigerator, I placed a .49 cent thrift store basket along with my .99 cents lemons.

A .49 cent thrift store vase and flowers I already had were place on the counter to add just a touch of yellow.

This ceramic pot place in the dinning room is over 30 years old. I made it before I was married, and it holds the slip of a plant that was given to us when our son died.

Pots line the window seal that were found at a thrift store as well.

The coffee art work I had on the wall by the coffee pot previously. I hung it above the window, accenting the coffee themed curtains. This was a thrift store find some time ago for $4.99.

My daughter gave this metal cup hanger that she found at the dollar store. I just added the cups from my dish set. Total cost $ free.

New dish towels hang on the oven door. They were only $1.25 each from Kohl's, using a 30% off coupon on the already 50% off towels.

I made a soap dispenser using a Ball jar my mother gave me. I used the pump mechanism from an empty soft soap. I spray painted a metal lid and drilled a whole in the center of the lid. To keep the pump in place I simply applied a liberal amount of hot glue to hold it in place.
Total cost = free!
 In the dinning area, I added a couple of plates to my made over shutter.
The plates were bought at TJ Maxx for $2.99 each.
Here's a break down of the total cost for accessories.
3 lemons @ .99 = $2.97
wire basket = .49
Faux window plants 2 @ .99 = 1.98
Canisters set of 2 for $8.99
Napkins = .25
Napkin holder = .25
EAT letters $1.25 each = $3.75
Small white vase = .49
Towels 2 @ $1.25 each = $2.50
Plates 2 @ $2.99 = $5.98
Total cost for accessories $28.14
For the total cost of the makeover I needed to add the price of the
Curtains = $4.99
and
1/2 gallon of paint = $15
Making the total cost of the project
( I did not include in this price things I shopped the house for - using what I had.)
That made for a makeover for under $50 !

New dish towels hang on the oven door. They were only $1.25 each from Kohl's, using a 30% off coupon on the already 50% off towels.

I made a soap dispenser using a Ball jar my mother gave me. I used the pump mechanism from an empty soft soap. I spray painted a metal lid and drilled a whole in the center of the lid. To keep the pump in place I simply applied a liberal amount of hot glue to hold it in place.
Total cost = free!

The plates were bought at TJ Maxx for $2.99 each.
Here's a break down of the total cost for accessories.
3 lemons @ .99 = $2.97
wire basket = .49
Faux window plants 2 @ .99 = 1.98
( I saw these plants in the store for $6.99 each!)
small white pot for window plant = .49Canisters set of 2 for $8.99
Napkins = .25
Napkin holder = .25
EAT letters $1.25 each = $3.75
Small white vase = .49
Towels 2 @ $1.25 each = $2.50
Plates 2 @ $2.99 = $5.98
Total cost for accessories $28.14
For the total cost of the makeover I needed to add the price of the
Curtains = $4.99
and
1/2 gallon of paint = $15
Making the total cost of the project
$48.18
( I did not include in this price things I shopped the house for - using what I had.)
That made for a makeover for under $50 !
Wednesday, May 9, 2012
KITCHEN MAKEOVER
You've been patient while waiting for my photos of our kitchen makeover. I'm sorry for the delay and not posting for a while, but we were out of town for church work. I've also been working on going through over 3000 emails because I've been bombarded with spam! Things got a little busy thus the delay.
Today I'd like to share how the kitchen and dinning room looked before I started the room makeover. (Somehow my before photos got deleted from my camera, so I'll share some from my files and the few that I managed to find on my camera.)


Today I'd like to share how the kitchen and dinning room looked before I started the room makeover. (Somehow my before photos got deleted from my camera, so I'll share some from my files and the few that I managed to find on my camera.)
The room was painted a with faux (Tuscany) look that included stenciled grapevines. The photo below was taken before the Toile curtain was hung.

View of the kitchen from the dinning area.

The photo above was taken when we were tearing out the old floor getting ready to put down the hardwood floor. You can see the walls in this photo. The glaze was applied using a feather duster.


The grapevines on the wall were a 4 step stencil that I painted. I snapped a photo of them after I already had the blue painters tape in place while getting ready to paint.

Here is a view of the dinning area taken while we working on wedding favor boxes.

The photo below is the room right after the hardwood floors were installed. The baseboard wasn't installed yet. This photo is also before the toile curtains, otherwise the room looked pretty much like this before I started the makeover.
The dinning room curtains that I made.

The curtain in the kitchen was a thrift store find.

In the next post I'll share the new and improved room. It's amazing how a few small changes can change the look of the room.
Subscribe to:
Posts (Atom)
LinkWithin
