Showing posts with label Furniture. Show all posts

Friday, January 30, 2015

DIY TUFTED HEADBOARD

Hi everyone!  Today I am going to be sharing my - DIY Tufted head board.  I must say, I'm happy to be back after over a month of no blog posts.  It's been a little busy around our home.  My husband and I both got sick at Christmas.  I missed all the Christmas parties; and it took me a good three weeks to get back to normal health.  Two weeks ago, I started a new job; and I've been in the process of working more hours with orientation.

For those of you who have reading my blog for some time, you may recall our son and daughter-in-law got married a year and half ago. I shared the DIY wedding rehearsal dinner that we did for their wedding.   As a wedding gift for our children, my husband has made a piece of furniture.  The couple gets to select what they would like.  They usually find a photo of the piece of furniture they like; and my husband builds it for them.  While preparing for the rehearsal dinner, my sister and brother-in-law were talking to my husband asking if he would be interested in a walnut tree that went down in their grove.  Of course, we jumped on that offer.  There was, however, quite a delay when the tree went to the mill. While at the mill, the owner had a fire and had to rebuild his kiln....thus we had to wait for the wood to get milled for almost a year.

Once we had the wood, my husband went to work preparing the wood. He then built the wood part of the bed.  Once he had that completed, we invited our son and daughter-in-law to help us assemble the tufted part of the bed.


We made the tufted headboard using the same technique we used when we made our tufted headboard back in 2010.

Tuesday, August 7, 2012

SUMMER TRENDS

Hi everyone, I'm happy to be back after a very restful week of vacation.   Vacation and summer go together like hand and glove.  I recently read that a few of the trends for 2012 summer are - bright colors and beachcomber decor.  Today I thought I'd share a few of these trends that I observed while on vacation last week.


Brightly colored adirondack chairs.


Along with brightly colored umbrellas,


and boards.


The beach decor has been described as 
elegant, coastal, vintage, vibrant, and nautical.


Here's a window display that would be described as nautical/coastal.


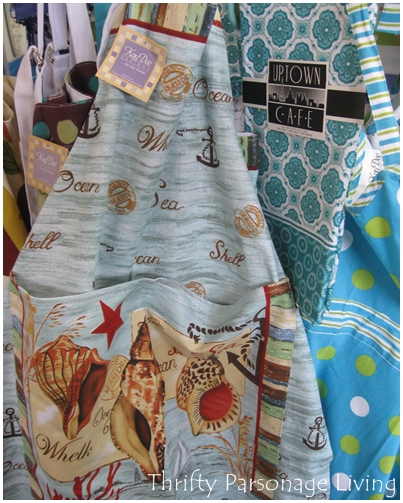
You can purchase coastal themed items like this apron or even lighting,


or a beach sign.


Even this wedding cake that we saw in the bakery had the nautical / beach theme.

Have you seen any of these trends this summer?

Wednesday, January 4, 2012

CUSTOM BUILT FURNITURE

Custom built furniture is a luxury to have in your home and I've been blessed with many pieces.  As I've told you before, I've got a very talented husband who can build furniture.  Some time ago, I showed you the pieces of furniture he has made for me.  I told you he had another project started.  These projects may take a while because he works on them in his spare time; and he doesn't have a lot of that.  Some of you have asked about this project so I thought I would reveal the latest project even though it's not completely finished.

~Ta da ~ 
The Hoosier Cabinet 


He's planning on making leaded glass doors to go in front of the top shelves.


He even made a custom tambour door that our bread machine sits behind.  The tambour door was built by gluing slats of wood to a piece of fabric, making it bendable to slide up and down like a roll top.


The Hoosier is a perfect place to display the antique dishes given us from our grandparents and great grandparents.


The side shelves hold flour, coffee and the 
coffee grinder.
He installed electricity in it, making it easy to run the coffee grinder and bread maker.
I'll soon be putting my coffee maker on 
the bottom shelf.


Here is how it looked all decorated for Christmas.


I think he did a great job on this piece of furniture.  I'm so thankful for his love and the use of his talents to make custom furniture for me!

Thursday, February 3, 2011

Transforming Wingback Chairs

Well, the transformation has begun!


I made my trip back to Jo Ann's fabric in search of new fabric for the wing back chairs. My search lasted for almost a hour. I didn't realize how difficult a task this would be. I love so many of the upholstery prints at Jo Ann's. Here are just a few that I liked and made my decision hard .....

Waverly Chippendale Fretwork Mist

Nexxus Aqua

Geometria Palma

Wavery Adorment Silver Fabric

After giving it a lot of thought, however, I realized that these chairs have curves, and a bold print could be a little much. I'll incorporate prints into the room in other ways.

The decision was made to stay away from white (see my post on the white fabric) or dark fabric. The curtains in the room will bring in dark brown, while the rest of the room will have tan / cream and seascape blue colors.

My final choice ended up being an off white duck fabric.


Here's my work in progress.


It took me 4 hours to get it to this point.


Along with some very sore fingers,
because I had to pull out all of these staples!


These chairs are going to take me some time!
But I'm calculating the dollars I'll be saving by DIY . Take a look at this Pottery Barn Chair.
Mine will be very similar when I finished with them.

The Pottery Barn Chair is listed with a price tag of
$699 - $849
Take that times two chairs, it will be quite a savings for me!

I plan to keep you posted as my work progresses.

Have a great day!


Joy


Thursday, January 27, 2011

Wingback Chair

My living room makeover has been coming together, but I've been struggling with my living room chairs. I have two "pink / mauve" chairs that I've had in our living room for about 15 years. The chairs were an inheritance gift and were high quality chairs. They remain structurally very sound chairs, but are very dated because of their color and fabric.


My first taught was to make some drop cloth slip covers, but decided against that.

I then found a set of chairs like these faux leather Avington Slipper Chairs from Target.


photo source - target.com

I even took a pair home, but they looked too small and dark for the space
along with the fact that my husband didn't like them because they lacked arm rests.

So I'm back to the wing chairs!

Jo Ann's fabric had their duck fabric half price last week so I bought some white fabric thinking I would reupholster the chairs.
Here it is laying on one of the chairs.
It looks too light compared to the room's cream/tan colors, wouldn't you agree?

So I'm off once again to Jo Ann's to look for new fabric.


Thursday, November 4, 2010

DIY Tufted Upholstered Headboard

Do you remember back when I showed you our master bed room makeover. I promised to share with you how we made our tufted upholstered headboard. Recently my makeover was featured at Remodelaholic and several people have asked for my diy instructions. (This post will be of some length.)


I've asked my husband to write instructions for me on the building of the bed since he is the carpenter in the family, while I took on the roll of helper and decorator in this project. This project was taken on three years ago when we decided to upgrade from a queen size bed to a king bed. We sold our four poster oak bed and took up the challenge to build our own headboard.
The inspiration came to us while staying at a hotel with a luxurious tufted headboard. We liked the fact that the headboard was soft and comfortable along with stream line for both a contemporary or traditional room along with adding elegance to the room.
We shopped around and found some great inspirations like these beds from Pottery Barn and Target.

(Photo - target.com)

Here are the plans he drew up before starting the project.

(The plans maybe a little blurred, if you are interested in seeing the plans better I could send you a pdf file.)

Steps for building the bed:

1. Cut 4" X 4" for headboard frame to the length.

2. Notch 4" X 4"'s as seen in diagram.
(note: all notches in the 4 X 4 are 1 1/2 inch deep.)

3. Cut dado 1/2' from back of frame 1/2" deep and wide enough to accept 1/2 " plywood panel.

4. Cut 1/2 " plywood panel for the headboard.

5. Glue and screw headboard frame together with plywood panel inserted in dados.

6. Build 2" X 6" frame. The frame will be inserted into the bottom notches in the headboard. Use 2" X 6" joist hangers to support 2" X 6" cross members.

7. Cut 4" X 4" "feet" for the "foot-side" of the bed frame. Cut notches 1 1/2 " deep by 5 1/2 " high (wide) on two sides. The "foot post" will be inserted on the inside of the bed-frame.


8. Insert "foot post" and screw into place with a 3" deck screw. Do Not Glue, otherwise, you'll not be able to take the bed apart for moving.

9. Insert bed-frame into notches in headboard frame. Securing with 3" deck screws, but do not glue.

10. Wrap head board 4" X4" with 1/4 " batting to within 3" of bottom of legs. Staple the batting onto the back of the headboard and inside the "foam cavity", created by the plywood in dados.
(Photo - joann.com)


11. Cover posts with upholstery fabric of your choice. Make sure that you keep equal tension on the batting and fabric to creating a smooth finish.


12. Cut 1/4 " plywood that fits easily yet without excessive play into the "foam cavity" created in the headboard with dados and 1/2" plywood insert. This 1/4" plywood insert will be used to make the upholstered foam insert.

13. Slide 1/4" plywood into the "foam cavity" holding it in place with 3/4" sheet rock screws screwed in from the back. Now drill 1/4" holes through both 1/2" and 1/4" plywood where each button will be located.

14. Remove 1/4" plywood and use spray adhesive to secure 3" foam into place and cover with upholstery fabric, making sure to work from the middle to the outside tugging gently to keep the fabric tight and flat.

(photo - joann.com)
15. Insert foam panel into the cavity and secure with screws from the back, making sure that the holes are lined up.
16. Working with a partner and an extra long sewing needle and upholstery thread or fish line for extra strength, fasten covered buttons onto headboard, working from the center buttons outward adding the outside buttons last. You can also use buttons on the back to tie the strings off and prevent knot pulling through the foam.


17. Assemble the bed where it will be in use.

18. Cut 1/2" plywood for the mattress platform and secure with 1" sheet rock screws.

19. We stapled the bed skirt to the platform before dropping the mattress onto the platform. This will help prevent your skirt from unwanted moving around on the platform.

20. If you have questions about this project just email.

21. Enjoy your new bed!


Joy

Thursday, October 14, 2010

Living Room Furniture

I've been looking for a new sofa for our living room.

Here's the sofa we have right now,
it's in good condition, but dated since it's over 12 years old.


I'm thinking of going with a neutral colored sofa.
It would be easier to change accent colors and wont date as quickly.

Here are a few of my inspirations for a sofa.


(photo ~ overstock.com)


Remember my recent trip to the Pottery Barn store...
here are a few of the sofas I saw there and liked.


(Photo ~ Pottery Barn)


(Photo ~ Pottery Barn)


I also like wing-back chairs that are white or cream .


Since the room already has two wing back chairs in it.

I think I'll be reupholstering them or making some slip covers.


We have several projects going on around our home right now.

The piece of furniture my husband is making for me.

A roof for our patio and the start of a living room make over.

I'll be keeping you posted on the progress of the projects.


Friday, October 8, 2010

Custom Built Furniture

Did you know that a lot of the furniture in my home is custom built?
Yes, I've been blessed to have a very talented husband who can fix almost anything from cars to fixing and building furniture.
He grew up as a carpenter's son, and over the years has developed a real talent for finishing and creating furniture. His way to unwind and relax is to work in his shop.


All I need to do is find a photo of what I would like him to build and he will make it for me.
Here's what he's made for me over the years.
The first items a cedar chest for a wedding gift to me.


The second was also a gift ~ my first Christmas as a married couple.


Shortly after the Christmas cabinet, he went to work on a crib for our first child who would be born the following October.
Sorry to say that was 30 years ago and I didn't take photos of it.
This desk I found a photo in a magazine
and he built it to fit a small space in the first parsonage we lived in.


I love all the detail on it and the inside has all these cute cubicles.


Sixteen years ago he built our bedroom furniture.


We went to high-end furniture stores to find the style we wanted. The highboy has a floating top just like the high-end store. This feature is for climate changes and can expand and contract with the weather.

This cabinet was built using white cedar lumber.
A friend milled a tree from his yard; and, in exchange for a few woodworking lessons, he gave my husband the lumber.
The painting on the doors was done by a local artist
making the piece unique to the area we live.
Other pieces of furniture that he's built me....
an oak pedestal kitchen table, headboard for our bed,
two glider rockers, entertainment center,
end tables, a coffee table and adirondack chairs for our patio.


He's started another project for me, can you guess what it is?

I'll share it with you in the near future!


I'm linking to...
BoostMyBlogFriday

LinkWithin

Related Posts with Thumbnails