Showing posts with label Makeovers. Show all posts

Monday, March 17, 2014

DINING ROOM TURNED OFFICE BY DUO VENTURES

Hi everyone, you might be wondering why you haven't heard from me for a little while. Well, I had unexpected oral surgery and haven't  been up to much, other than trying to recover.  


I thought I would take this opportunity to have a guest post from Mel and Nader at Duo Ventures.  If you have not read their blog you've been missing out!  I love pretty much every makeover and organizing idea that they have shared on their blog.  They are a young husband/wife team,  who blog about design, DIY projects and organization.  You can head over and read more if you enjoy this post from them at Duo Ventures.

In the post below they'll tell you how they turned their dining room into an office.... enjoy!

 All the  images and content below are courtesy from the Duo Ventures.

Turning a Dining Room into an Office: Part 2


Well, we're happy to say that a lot has changed in our former dining room!  Several months ago, we made the decision to utilize our formal dining room as a home office instead.  We left off in Part 1, where we outlined our general plans & inspiration for our future office.  If you follow us on Instagram you might have gotten a couple of sneak peeks along the way.  There are still a couple of small projects that we need to complete, but for the most part the room is finished!  

Wednesday, February 5, 2014

GUEST BEDROOM MAKEOVER

Can you believe it's a year ago today, we were on the road moving from Washington to our new home in Minnesota. Time sure flies by quickly.  Looking back over the year, I realized that I have not shown you all of the rooms in the new Parsonage.  Over the next weeks I plan to do just that, along with showing you the projects completed in each room.

Today, I will start with our guest bedroom which is in the basement of our home.


Now this room looked nothing like the photo posted above.  In fact the room looked pretty tough.  All the carpets had been ripped out of the room a few years ago because of water getting into the basement.  At the time of the water issue, they had to rip up all the carpets in the entire basement and lay tile.

Wednesday, October 2, 2013

MY HIGH LOW PROJECT

I've been looking for some time now for a small side table or nightstand. My husband works on his laptop quite often in the evening while sitting in our family room.  He has to frequently run to his office for supplies: pens, stapler, calculator etc.  A small chest or night stand to sit next to his chair would be the perfect solution to store a few supplies.   I finally found what I was looking for on Craigslist for ten dollars.

It was in pretty bad shape, but I knew I would be able to fix it with a little TLC and paint.


The top looked bad too!

Saturday, July 6, 2013

DIY BATHROOM MAKEOVER

Since our move in February, I've been working fast and furious at getting everything unpacked, and started right into painting projects. I wanted our home to be ready for all the guests coming for our son's wedding.  In spite of my best efforts to have everything done before the wedding, however, there was still a half bath that needed some TLC.  Since I was missing our children and grandchildren, I thought a little project would help get my mind off of missing them.


Our half bath was the perfect project.

Monday, April 22, 2013

LIVING ROOM REVEAL

I know you've waited a long time to see what I've been up to in our new parsonage.  In my last post, I gave you a little peak into the living room when I showed you my diy bookcase makeover.  Today you get to see the whole room.  It's the only room in the whole house that I can say is finally finished. The room had a long list of to do projects, but thanks to the helping hands of church friends the room is finished.  While we were still in Washington I received a call from a member of the church.  She told me they would paint my husband's office and living room for us, and asked what colors we'd like the rooms to be.  She also told me they were installing all new lights in the parsonage (including pot lights in the living room), and updating the electrical outlets.  I remembered from living in the house 16 years ago, that the living room could be very dark because there were no lights in the ceiling.
 
After a lot of labor pealing off a wall paper boarder that had been painted over, the new paint color is on the walls and it looks wonderful!  It is a soft gray, (Portand by Valspar); and the ceiling is a bright white ceiling paint.  I love how it brightens up the room!


We took down the old curtains and put up new blinds. 

Wednesday, December 5, 2012

CANDLE STICK MAKEOVER

While shopping at my local thrift store this fall, I came upon a pair of brass candle sticks.  I bought them at the 50% off sale, making the total price for the candle sticks $1.49.


I knew I would give them a makeover eventually. It was while decorating the living room for Christmas that I decided to make them over.

Wednesday, November 7, 2012

THE OFFICE REVEAL

The day has finally come that you've all waited so patiently for: my office makeover reveal!  As you may recall, it started out as a closet makeover, but turned into a larger project when we had to treat a mold problem and do a lot of painting .  We also decided to add new baseboard and trim while doing this makeover.   I also did a lot of purging and organizing of this space including going through all drawers and files. The end result - a prettier more organized office that functions well for me.

 I present to you my new office closet.


I really had planned to go to IKEA to buy storage boxes and containers for this space, but we ended up not taking our daughter to the airport in October.  I couldn't justify a four hour round trip just to get them.  I've instead reused many items I already had in my home.

Monday, November 5, 2012

THE OFFICE MAKEOVER PROGRESS

I had hopes to share my office makeover last week, but I was unable to upload photos or blog posts because of the bad weather causing our  internet connection to be down.  A very small inconvenience compared to what the people on the East coast are dealing with.  Today I want to show the progress of the office closet; and hopefully later this week, I'll be able share the whole room.

Wanting to keep to our budget (which is small and limited), I decide to keep an eye out for used materials.  I couldn't believe my good fortune while shopping our local thrift store,  I found a shelving package.  It had 4 lament shelves along with rail and brackets. The only problem was that I wasn't sure the shelves were the right length, so I passed them by.  A week later when I saw the price of materials (a package of two brackets at Lowe's - $13.37 and the rails for $12.60 each), I decided to go back to the thrift store and see if they were still there.  To my great surprise, they were still there and on sale for half price with a price tag of five dollars!

In the photos below you can see the progress of the shelves going up.


My husband decided it would be best to have 3 rails with three brackets for each shelf, because of the weight these shelves will be holding.  We ended up having  to buy two more brackets costing $13.37.

Total cost for materials = $18.37
Cost for labor = FREE, thanks to my dear husband for doing the work.

If you've missed any of the posts on the progress of the room, you can read past post by clicking on the highlighted area below.

Chair Makeover
New Baseboard and Trim
Lamp Makeover
Office Closet Painting
Deciding the right wall color for the office closet
Office Makeover
Office Makeover Progress
The Closet Makeover Has Begun
Closet Makeover

This makeover is almost finished and I can't wait to share it with you!

Friday, October 26, 2012

CHAIR MAKEOVER

A chair makeover for my office.

The work in my office is coming along slowly but surely.  I don't share a lot about my personal life on this blog, but do so occasionally.  Today  I thought I'd explain why the progress on the office  has been a bit slow.   My husband (a pastor, and my helper/carpenter) has had to sustain a very difficult exam this past week. Our church has been independent for the past 6 years and decided to join a federation of churches; and because of that decision, he was required to take another oral exam.  This exam is very difficult and stressful.  It's compares to the oral exams he took for his master's degree.  What made it even more difficult is that it's been over 20 years since he received his master's degree.  Over the past few weeks, this has required all his attention to his studies for the exam.  I'm very thankful and proud to say he passed the exam!

While he was busy with his studies, I decided to work on a few small projects  for my office. 

I bought a chair for $5 a few years ago at a yard sale to use as a sewing chair.  This is how it has looked since the day I bought it ... brown cushion and brown wood.


OK...but I thought it could use a little sprucing up.

Wednesday, October 24, 2012

NEW BASEBOARD AND TRIM

We're moving on to adding the new trim and base board in my office.  Let's take a look at what we started with.  Old yellow looking wood dating back to when the house was built.


We decide to add white trim molding and baseboards.


 In the above photo, you can see the trim inside the closet. We decided to go with a plain trim on the inside of the closet without the rosettes since it's not visible when you walk into the room.

We added rosettes on the corners of the door trim. I like the charm it adds to the room but also adding these made it much easier for installation.  My husband could do straight cuts and didn't have to make mitered corners.


Here's a view of the new baseboard.  It's amazing how this new trim makes the room look so much newer and brighter.

Friday, October 19, 2012

LAMP MAKEOVER

The  progress in my office /closet makeover is slow and steadily moving forward.  Today I thought I'd share with you one of the small projects I've done.   I knew I wanted some sort of lighting for the closet since it can be a bit of a dark corner.

 I decided against a lamp that would sit on the desk and take up precious work space.  I reflected back to the inspiration closet/office photo from Jen @ I Heart Organizing.  She used a wall mounted lamp.


At Pottery Barn I found the perfect lamp in an antique nickel finish.  The problem was the price tag it came with of 89 dollars.
Then I remembered an ugly old gold lamp in our attic purchased back in the 80's.  Its lovely pleated shade was dented and falling apart.


The base with a "lovely" gold finish.

Wednesday, October 17, 2012

OFFICE CLOSET PAINTING {PART 2}

Continuation of the office/closet painting makeover.

Originally I'd thought that I would paint all the walls blue in the closet, but after applying the white primer, I realized that I really liked how bright the white made the room look.  I decided to paint the back wall white and the two side walls the blue color - Lighthouse Shadows by Valspar.

I checked into putting pretty wall paper (allen + roth Sea Breeze Floral Trail wallpaper) on the back wall, but it was to expensive for my budget with a price tag of $59.96 a roll.  We're already spending more in this room than we first had planned by adding new baseboard and trim.  I opted to stencil the wall instead.  In the photos below you can see my test spots.

 The first one I tried was from Jones Design Company  -  a hand painted wallpaper.


The second  is a stencil I found on line at Hobby Lobby.  It was $16.99 but using an online coupon and free shipping made it $10.20.  I ended up choosing the Hobby Lobby stencil even though I liked the painted wall paper.  The thought of painting all the lines by hand seemed very labor and time intense.  Note the white paint over the blue, which was my first thought for the painting project.

In the photos below, you can see the process of painting the stenciled wall using the blue paint over the white.  I followed the instructions and stated at the top of the wall in the center.    To make sure the stencil stayed straight on the wall I used a level and worked across the wall horizontally. I continued this process working  my way down the wall.


Here's how it looks once the side walls were painted and stenciling was completed.


Oh, so much better !


I'm loving how the closet is turning out.  Stay with me; and I'll continue to show you the process for the rest of the closet and room.

Monday, October 8, 2012

OFFICE MAKEOVER

My office closet makeover has grown.  While working on this project, we've run into some snags - unexpected problems.  These problems made added work of re-taping the dry wall and many layers of new primer and paint.  This project has turned into more of a room makeover rather than a closet makeover.   My husband and I were discussing the room this weekend and came to a decision.  Since the room is getting more torn apart than planned and the wood work around the closet door and the base trim in the closet is being replaced, why not make the whole room look nice and get rid of the rest of the old trim. 

 Here's what the trim and baseboard look like in this room dating back to when this home was built we're guessing in the 30's or 40's.


Take note - they never even bothered to fill the nail holes.


 Old trim and plywood doors.


I'd say pretty ugly and dated trim.

This is what the room looks like as of this morning.


The trim and baseboard has all been removed; and we're off to Lowe's to buy new.


This afternoon I'm hoping to get all the trim painted (we are buying the trim that is already primed).  While I'm doing this, my husband will be working on installing the shelving system.    I'm also hoping to start the purging of office items that will be brought back into the room.  I'm getting anxious to have this room done and my house back in order.  You can look forward to more posts on the progress of the room.  We're getting closer to seeing the end results of a wonderful office makeover !
 

Monday, October 1, 2012

THE CLOSET MAKEOVER HAS BEGUN

Hi everyone, I hope you had a great weekend.  Last week I told you of my plans to make over my office closet.   Well, the work has begun.


 Let's start off by taking a look at this crowed, cluttered closet.


In an attempt to add book storage a few years ago, a small shelf was added.


As you can see in the photo, the shelf above the basket runs only 1/4 of the way across the closet and virtually inaccessible unless you get a ladder and stick your head around the corner into the space. There were a few things that got placed on these selves but never used for anything that needed accessing.  This room, along with the rest of the house, suffered from the roof leaking for 12 years before a tree fall on the roof making yet another major leak.   I knew the office had water damage on the ceiling, but didn't realize what we would find when we tore into the closet. (We are thankful that the church had the roof replaced and no more leaks.)
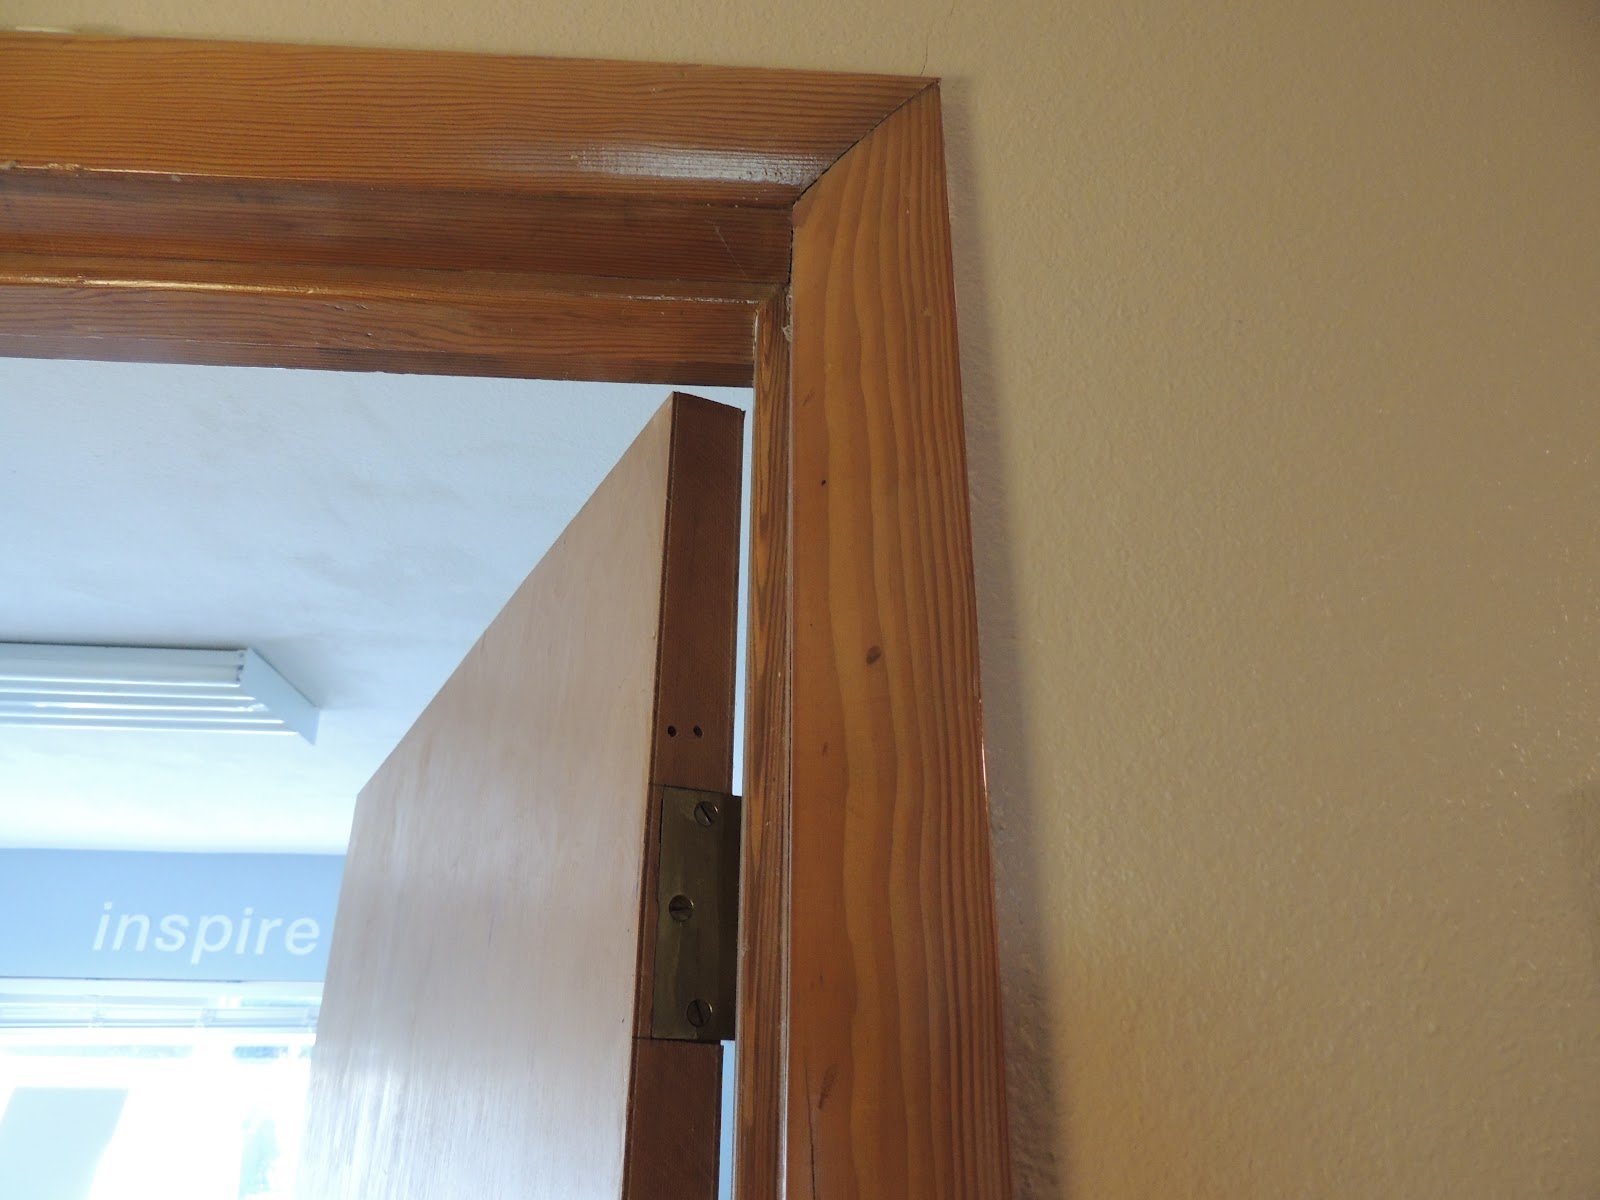
 This is what we found.
Gross mold Out came my rubber gloves, mask and a bucket of hot bleach water, and the cleaning began. The tape in the corners of the closet was letting loose as well.  I tore this off and my handy husband re-taped the dry wall.  At the same time, he made the door opening larger to fit a standard 4 foot bi-fold door.  Any of you who have done dry wall taping know the process of mudding, sanding, more mudding, sanding and loads of DUST!


This project is turning out to be more work than what I had anticipated, but the end results keeps me moving forward.  In the mean time this is what our living room looks like with all the office and closet stuff !


 Someone from the church stopped by Friday evening and asked if we were moving!  Who would guess a small room could have so much stuff!  My goal for this fall and winter is to purge our home, and get more organized.

Thursday, August 16, 2012

BATHROOM MAKEOVER & PAINTING PLASTIC WALLS

Back in April of 2010, when I first started this blog. I shared my bathroom makeover for under $500. I actually think it was done for quite a bit less, but we did the makeover shortly before I started this blog. I didn't write down the exact amounts we spent on finishing the room.


Rita from Harbour Breeze Home recently asked me a question regarding this makeover.  She is planning a bathroom makeover also.  As you can see in the photo below, her bathroom is same floor plan as ours.  Even the retro light fixture is the same fixture we had before our makeover.


 While looking back at the post I realized I hadn't shown you somethings I did in this room.

 
See the area directly above the shower stall. It used to be a solid wall of beige plastic with a seam about 18 inches from the ceiling.   I came up with a thrifty fast solution to get rid of the wall of beige plastic.

PAINT

Here's what  I did ~

First I scrubbed the wall very well. I then  ruffed the surface a bit using sandpaper.  The next thing to do was add a coat of primer.  After the primer was completely dry, I just painted it with latex paint.  My husband then added crown molding that he made using salvaged lumber.

We use the shower in this bathroom and I wondered how it would hold up.  It's been on the wall for four years and still looks like the day I painted it.


At the time of the remodel we also added a curved curtain rod.  It's a little trick you can do to add more space to a small shower area.  My thrifty finds ~ 99 cent Goodwill rings and a 50 cent garage sale shower curtain help hide the remainder of the ugly beige shower surround. 


Have a great day!

Friday, August 10, 2012

GOODWILL HUNTING - A LAMP MAKEOVER

We recently were on a camping vacation, enjoying sunsets on the beach in Cannon Beach Oregon.


 We've been doing a few updates in our tent trailer to make it a little more our style and to feel more like home. The lighting in the trailer can be a bit poor and we thought it would be helpful to add a small lamp.   We decided to stop at Goodwill and see what we could find.  My husband and I wanted something that would go well with the interior of the trailer.  It has blue's and brown's in the decor, as you can see in the background of the photos.

Here's what we found for $1.99 and $3.99.


Our original intentions were to remove the electrical parts of the lamp and place them in the lantern.  That would be cheaper than buying a new lamp kit.


Which my husband did.....
                                     ... but sometimes things don't work out like you envisioned.  When we placed it in the lantern and added the lamp shade, it lacked color and was very bland!  Soooo.... my husband reinstalled the electrical fixture back into the original lamp.  After all that, it was time to move onto the fun part of the project.

Decorating the new lamp shade.


We collected our supplies which consisted of sand dollars, starfish, shells and rope.


I began by gluing the rope to the shade, adding clothes pins to hold it in place until the glue had set. I then added the sand dollars and starfish.  We decided not to add the shells because it looked a little busy with to many items on the shade.

Here's the finish lamp. 
 (Sorry about the poor photos - remember the lighting is poor in a tent trailer.)


We can now enjoy better lighting while camping in our tent trailer.
Our home away from home.


LinkWithin

Related Posts with Thumbnails