

Tuesday, March 26, 2013
HOME TOUR [part 3]
Today you'll finally get to see the rest of our home - The Parsonage. I left off last time showing you the bedrooms .
I've found a photo of the 5th bedroom since my last post. I'll begin the tour today with that photo, and move on to the bathrooms and the rest of the basement.
 The church is still in the progress of finishing this room. The room was a larger room with cement block walls and a small closet. They have moved one wall over and added insulation, dry wall, new closet and new escape window. The room still needs all the trim work, baseboard and flooring.
Monday, March 18, 2013
HOME TOUR OF THE PARSONAGE {part 2}
Today I'd like to continue with the tour of our new home/parsonage. Last week I showed you the living room, dining room and kitchen. Today I'll show you the bedrooms. First I'll take you down the hall to view three of the bedrooms.
The hallway to the bedrooms is just off of the dining room. The same paint color and stencil design (only minus the berries and leaves) from the kitchen and dining room continues down the hallway. The first door on the left is a linen closet and the door on the right is to the main bathroom. The next two doors on the right are bedrooms and on the far left is the master bedroom. The hallway and bedrooms have hardwood floors. The hallway floor has been refinished, but the bedrooms floors need refinishing. They are on our to do list for this summer.

The first bedroom on the right is the smallest of the bedrooms and had wallpaper on the lower half of the walls along with a boarder.
Wednesday, March 13, 2013
PARSONAGE HOME TOUR
I know you've all been waiting a long time for a tour of our new home/Parsonage. Today I'll begin a tour of this 1960's ranch 5 bedroom two and half bath home. The photos of the home where taken back in August 2012 when we flew out to meet with the church council and stayed in the Parsonage for a few days. I have a limited number of photos, because they were taken with my old camera and it was acting up at the time. I'll show you these photos and later show you what we have done to change the look of the Parsonage. The tour begins at the front door where you walk into a small entry area and the living room.


When we lived in this home 16 years ago the rooms where all painted white, making this room look very different.
Thursday, March 7, 2013
THE NEW PARSONAGE
Hi everyone, I know it's been a while since I wrote a post, but it's been extremely busy here. We've been trying to get settled into our new home, and at the same time busy with projects. I know you've all been wondering where we live, so without further delay welcome to...
Here's the outside of our new home.

It's a ranch home built in 1962.
The Parsonage
Here's the outside of our new home.

It's a ranch home built in 1962.
Wednesday, February 27, 2013
MOVING ACROSS COUNTRY
Hi everyone! I'm glad to be back after being absent for a few weeks while we were moving across the country. A BIG thank you to everyone who helped me with guest posts. I'm thankful to report our move went well. I was a bit nervous about the thought of moving and traveling 1700 miles on winter roads, and many miles on mountain roads. I'm thankful for answers to prayers, the Lord provided dry roads and safe travel.
Today I thought I'd share a few photos of the final days - packing up the trucks. The final day of packing we woke up to a beautiful morning and this was the view across the road from our home. Oh how I will miss the breath taking view.

We rented two 26 foot trucks along with a dolly to tow our car. Four men from our new congregation in Minnesota flew out to help with the packing and driving the trucks, while my husband and I drove our pickup pulling out boat.


Everything had to be packed very tight to save space and ensure no shifting while on the road. Heavy items such as books where placed in the front of the truck.


The furniture was covered with blankets first, followed by shrink wrap to keep the blankets in place. We wrapped the legs on the furniture with bubble wrap and then shrink wrap. We used up two small and two large shrink wrap rolls. I think we also used up 10 + rolls of packing tape for all the boxes.

My husband built a plywood ramp out of the house for easier loading, eliminating the need to go down steps.
We were so thankful for all the people who helped with our move. We had help from our congregation in Lynden along with the men from Minnesota. Our granddaughters even gave us a little help.


My husband built some wracks to place odd shaped furniture on. This made it possible to stack other items on top of furniture. He also built crates around items like the lawnmower and exercise equipment. By doing this we were able to make use of all the space in the trucks.


Today I thought I'd share a few photos of the final days - packing up the trucks. The final day of packing we woke up to a beautiful morning and this was the view across the road from our home. Oh how I will miss the breath taking view.

We rented two 26 foot trucks along with a dolly to tow our car. Four men from our new congregation in Minnesota flew out to help with the packing and driving the trucks, while my husband and I drove our pickup pulling out boat.


Everything had to be packed very tight to save space and ensure no shifting while on the road. Heavy items such as books where placed in the front of the truck.

You can't have to many blankets. We had 10 dozen blankets and used all of them.

The furniture was covered with blankets first, followed by shrink wrap to keep the blankets in place. We wrapped the legs on the furniture with bubble wrap and then shrink wrap. We used up two small and two large shrink wrap rolls. I think we also used up 10 + rolls of packing tape for all the boxes.

My husband built a plywood ramp out of the house for easier loading, eliminating the need to go down steps.
We were so thankful for all the people who helped with our move. We had help from our congregation in Lynden along with the men from Minnesota. Our granddaughters even gave us a little help.

One to supervise and the other to help pack boxes :)

My husband built some wracks to place odd shaped furniture on. This made it possible to stack other items on top of furniture. He also built crates around items like the lawnmower and exercise equipment. By doing this we were able to make use of all the space in the trucks.

The men giving their backs a rest.
We finished loading the trucks by noon on Saturday, giving us the opportunity to show our guests the beautiful country side we lived in.

Mt Baker and the Twin Sisters - view behind the Parsonage.

The Puget Sound.

Deception Pass
My next post I'll share about our new home....
The Parsonage.
Friday, February 15, 2013
DIY LEG WARMERS FOR BOOTS
Today I welcome back Brie from Breezy Pink Daisies to share one of her genius thrifty DIY projects. Thanks Brie for being here today as my guest!
**********************************************************************
Hi Thrifty Parsonage Living readers! I'm Brie from Breezy Pink Daisies and I'm so excited to share this mini project with you because it is so easy, it took me all of 30 seconds!


My inspiration: This old short sweater with stains.

So, project #1 with the sweater involved chopping off the sleeves and putting them on my legs. Make perfect sense of course. (Since the bottom of the sleeve is already finished, I wear that part on the top and don't worry about the bottom since that will be covered by the boot anyway.)

 Okay, I don't walk around like this...but don't you love my Christmas socks? :) I might recommend wearing these leg warmers only when you plan on keeping your boots on. haha
Yay for leg warmers that look so cute with my boots!

**********************************************************************
Hi Thrifty Parsonage Living readers! I'm Brie from Breezy Pink Daisies and I'm so excited to share this mini project with you because it is so easy, it took me all of 30 seconds!
Do you have an old sweater? Do you not sew very well? Well, go ahead and make your own leg warmers with only a pair of scissors! (Well, and that old sweater we were talking about..)

So, project #1 with the sweater involved chopping off the sleeves and putting them on my legs. Make perfect sense of course. (Since the bottom of the sleeve is already finished, I wear that part on the top and don't worry about the bottom since that will be covered by the boot anyway.)
Yay for leg warmers that look so cute with my boots!
(Yes, I cropped my head out on purpose. I promise it looks cuter this way)
Thanks again for having me here! Don't forget to stop by Breezy Pink Daisies and feel free to follow me on GFC, Facebook, or Blog Lovin' so we can get to know each other!!
But...here's a cute picture of me with my head included just because it is cute and so is my hubby. Oh my, don't you wish it was summer time again?
 Oh well, at least I'll be enjoying my new leg warmers in this fabulously cold January weather!

Thanks again for having me here! Don't forget to stop by Breezy Pink Daisies and feel free to follow me on GFC, Facebook, or Blog Lovin' so we can get to know each other!!
Monday, February 11, 2013
DIY STENCIL WALL
Today I welcome Brie from Breezy Pink Daisies as my guest. I saw her stenciled wall and fell in love with it and asked her to share it. Thanks Brie for your help while I'm away!
*********************************************************
Hi there Thrifty Parsonage readers! I'm Brie from Breezy Pink Daisies and I'm so happy to be here while Joy is busy moving. {Good luck Joy!} So I found Joy on Pinterest and knew we'd be great bloggy friends right away. We have so much in common (Love of garage sales, thrift stores, God, and decorating!) Funny fact, we both made similar camera bags inserts (here's mine) before we even "met".
Anyway, onto this post I'll be sharing with you guys. So I can be very indecisive. I got a stencil in September and just finally used it to stencil one of our walls over Christmas break. O my, I am IN LOVE with how it turned out! Why did it take me to long to do it?! My excuse was that it was so hard to decide which wall in my house to stencil because I don't have many nice small rectangle walls and my family room has wood paneling so that entire room wasn't an option. I thought about doing our bedroom - but not many people see that room. So I ended up doing a random wall to the right when you walk into our house.
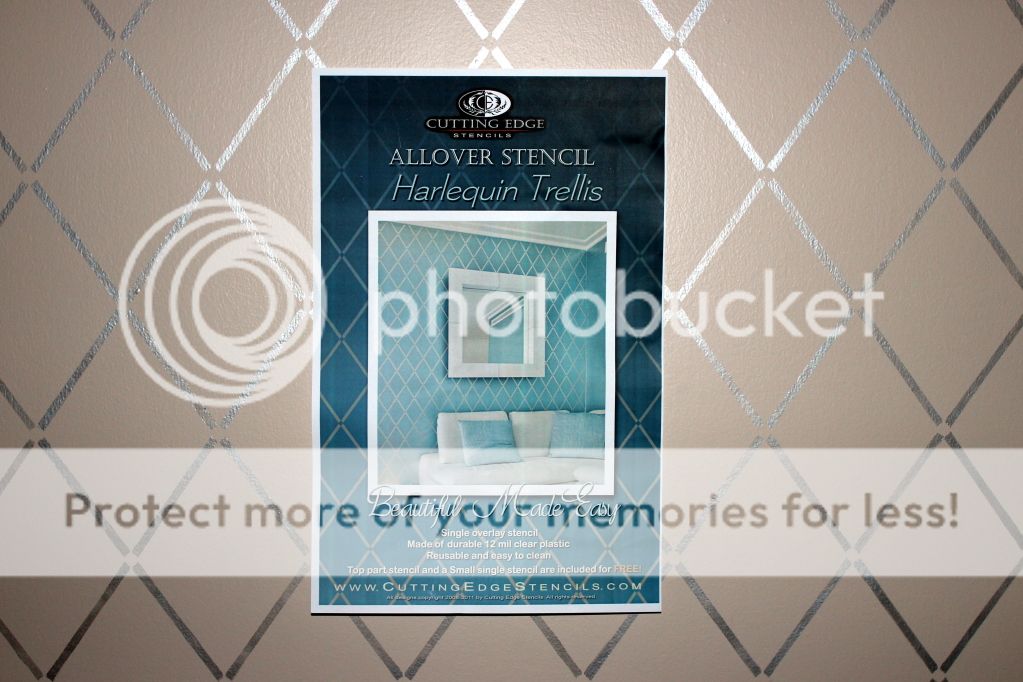
 The stencil I used was from Cutting Edge Stencils and I won it from one of my favorite DIY bloggers - Sam at The Junk House. The stencil I choose was the Harlequin Trellis Allover Stencil. The background wall color is Comforting by Behr and the stencil color is Metallic Silver by Martha Stewart.
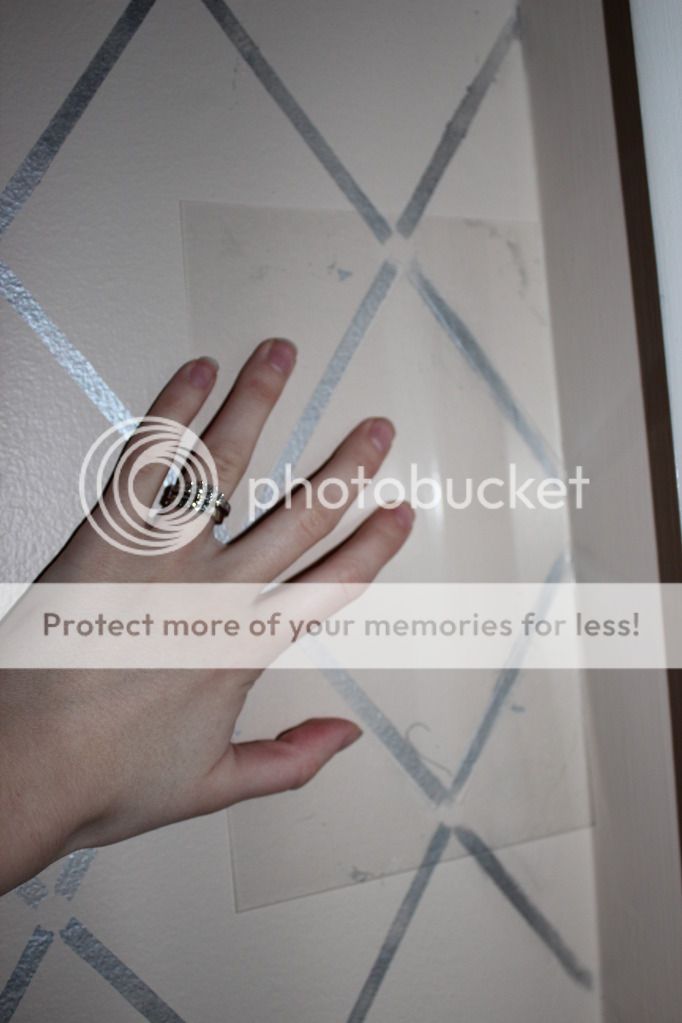
 Metallic paint is so much fun! So glad I choose that after MUCH debating over what color I would use. Surprisingly, it didn't even use half of the paint to do the entire wall! So, I have a lot to use on other projects...hmm. However, it is really difficult to take pictures of because it reflects light, but that's what I love so much about it in real life!
It took about 4-5 hours to complete. And that was with my standing back and admiring my work after each stencil and also "erasing" a few sections when I decided they looked funny or didn't match up perfectly. (The paint was actually pretty easy to wipe off even after being on the wall for 10-15 minutes!)

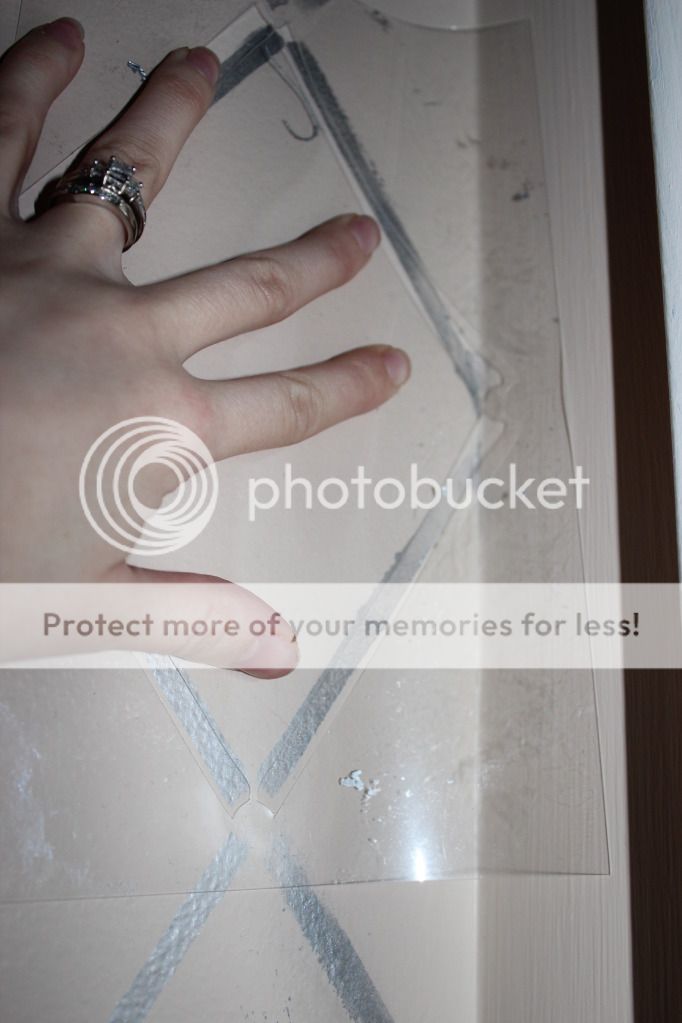
 You can see in the progress pictures that the stencil does not go directly to the corners - don't worry I didn't forget about those! Well, thankfully Cutting Edge Stencils gives you three stencils - the large one, and two smaller ones to help fill in those smaller areas.
Painting the corners was the most difficult part of this project for me. Cutting Stencils recommends to bend the stencil so you can reach the corners, but this was really hard for me - probably because I didn't have any help.

 After a little self convincing talk, I decided to cut the small stencil so that it would line up nicely against the wall. See the difference that made in the pictures above. It saved me a lot of time and frustration and probably some tears too. Just being honest here!
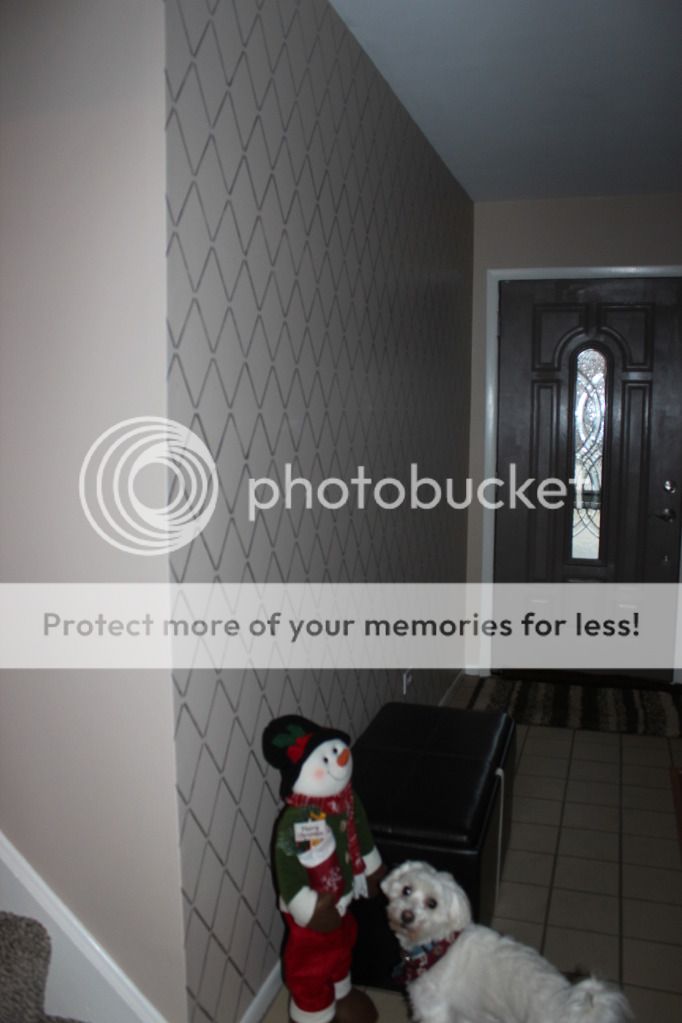
Isn't my wall beautiful?! I could just stare at it forever :)

Thanks so much for having me over here!
Feel free to stop by Breezy Pink Daisies. I love meeting new people, so don't be shy! And you can see all the crazy and fun things I've been up to lately...like dressing up as a fire dancer at a murder mystery party and coloring light bulb with sharpies :)
*********************************************************
Hi there Thrifty Parsonage readers! I'm Brie from Breezy Pink Daisies and I'm so happy to be here while Joy is busy moving. {Good luck Joy!} So I found Joy on Pinterest and knew we'd be great bloggy friends right away. We have so much in common (Love of garage sales, thrift stores, God, and decorating!) Funny fact, we both made similar camera bags inserts (here's mine) before we even "met".
Anyway, onto this post I'll be sharing with you guys. So I can be very indecisive. I got a stencil in September and just finally used it to stencil one of our walls over Christmas break. O my, I am IN LOVE with how it turned out! Why did it take me to long to do it?! My excuse was that it was so hard to decide which wall in my house to stencil because I don't have many nice small rectangle walls and my family room has wood paneling so that entire room wasn't an option. I thought about doing our bedroom - but not many people see that room. So I ended up doing a random wall to the right when you walk into our house.

It took about 4-5 hours to complete. And that was with my standing back and admiring my work after each stencil and also "erasing" a few sections when I decided they looked funny or didn't match up perfectly. (The paint was actually pretty easy to wipe off even after being on the wall for 10-15 minutes!)
Isn't my wall beautiful?! I could just stare at it forever :)
In these next two pictures you will meet Raphie and Francis. Can you guess who is who? :)

Thanks so much for having me over here!
Feel free to stop by Breezy Pink Daisies. I love meeting new people, so don't be shy! And you can see all the crazy and fun things I've been up to lately...like dressing up as a fire dancer at a murder mystery party and coloring light bulb with sharpies :)
Subscribe to:
Posts (Atom)
LinkWithin
