Wednesday, May 25, 2011

Reupholstered Wingback Chair Revealed

I've been working for sometime along with my dear husband reupholstering our wing back living room chairs.

Here is what we started with ~ 
 two very dated 
Pink Velvet Chairs.

First thing I did, after picking out my fabric, was to remove the old fabric.
You can read about it here.

This is how the chair looked after the fabric was removed.
While removing the fabric, I took many photos to help me remember how to put it back together.  I also wrote on the back of the old fabric...labeling each piece for reassembling.
They were then placed on the fabric to act as patterns.


 Since I'm very thrifty and have a limited budget
to work with,
I recycled the zipper and all the piping.


I sewed new piping...


...and created my own knife pleat for the skirt.
Read how I sewed the knife pleat  here.


Then the reassembling process could begin.  Batting was added to the tops of the arms, and the fabric
stapled in place.


My husband helped me with all the stapling of the fabric.


After we had the fabric stapled into place, I realized 
we had a problem!

When I decided to add the knife pleat skirt....

all the ones I'd looked at were slipcovers and not upholstered.


Oh...Oh!!!!
How to attach it???
After researching a little I found a blog tutorial by
Centsational Girl on double welted cord.
 So I whipped some up only to find that my staples
still showed in the middle of the welting. 
The question remained ...
what to do now?


I finally came up with the solution: First, I sewed a one and a half inch strip of cloth on the top of the box pleat right sides together.  Next, I folded the strip of fabric over, and top stitched it approximately 1/2" from the fold.  Then I folded and ironed the top of the fabric strip (1" now folded over and down the backside).  Piping was then stitched into place (see picture below).  This left approximately 1/2 inch strip of cloth just below piping on back for staples.


Whala.... the staples are hidden!


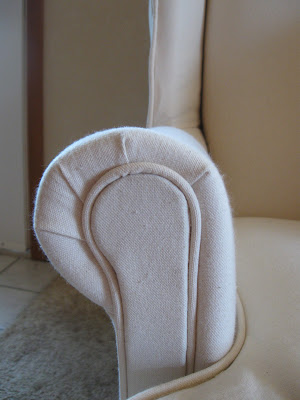
We found the duck fabric hard to work with as an upholstery fabric. The cloth has virtually no stretch making it difficult to work with, so the chair isn't with out mistakes.  I love the finished look, however, making it worth the effort.  A vast improvement over the pink velvet!


I've added a few accents to the chair - an afghan that I purchased from Goodwill for $ 2.99, 
and two pillows that I made.
  You can read the tutorials for the nest pillow  here and the pocket pillow here.


So what do you think?
I'd say not to bad for a $35 transformation!


One chair done and one more to go!


I'm linking this post to....
{Primp}

Tuesday, May 24, 2011

I'm Back !

Life has been a little busy around here as you may may have noticed by the lack of posts.  Two weeks ago, I was busy getting ready for a garage sale and packing for a trip.


  This past week I traveled over four time zones with my husband.  He attended a pastors conference, while I visited with relatives.

The first night we stayed in a hotel, doing a park and ride to the airport.  That night in the hotel was eventful ~ we were awakened at 2 a.m. to a fire alarm!  Yikes!  Thankfully, it was a false alarm; and we were able to stay the rest of the night in our room.  Needless to say, I didn't sleep after that!  We had to be up to catch our flight at 4 a.m., so not much sleep for me!

We arrived to our destination safely and were greeted by warm  weather.  It was overcast but in the 80's.  Here are just a few photos of the beautiful flowering spring trees we enjoyed.


Our return trip home was eventful as well.  We arrived to the airport only to find our flight delayed by a half hour...then a hour and then two!  This caused us to miss our connecting flight.  Thanks to Delta, we had a great dinner and lovely evening in a hotel.

Now that we're back home, I had a lot of catching up to do.  Tomorrow, I hope to reveal my newly reupholstered wingback chair. 

Please return to see the transformation!

Thursday, May 5, 2011

DIY DAILY ORGANIZATION SYSTEM

I've been wanting to create an organization/message center for our home.  Having very limited space for this in our home, I chose the side of our kitchen cabinets.  


Here's a before photo - just a calendar hung here.


Pottery Barn has a customized organization system that enables you to create your own message/organization system. The only problem is their systems would cost $44 (on sale) for each piece I wanted.  I set out to make an area myself using my DIY skills. I started looking for used items that would work in the area.  You can imagine how excited I was to find a whiteboard calendar for .99 cents, a pin board for $1.99 and cork board for .49 cents.  Although they did need a little sprucing up. Here they are with their imperfections.


As you can see by the photo, the whiteboard needed a good cleaning.


The pin board needed some touch ups that were easily fixed with a sharpie pen and stapler.


Here's my new daily organization station.

(The location of my organization station makes it difficult to get a nice photo shot.)


The white board on the top was purchased at Micheal's using a gift card and 40% off coupon making it $5.00.  I'll be exchanging it because I found a dented area on the top left.


Here are the other pieces all cleaned up.


I added some extra tacks and magnets from my office. I also added "notes" using some left over lettering from our daughters wedding.


My version for $9 compared to $142 at Pottery Barn.

LinkWithin

Related Posts with Thumbnails