I really wanted to make over the stairway to our basement. All the guest bedrooms are in the basement, so this area will be seen by everyone coming to stay at our home. When we lived in this house previously, the entire stairway and basement was carpeted, but sometime between then and now the carpet has been removed leaving the stairway to look like this.
Not my favorite choice of style with speckled paint on the stairs (it looked like paint splashed all over the stairs and basement floor).
Brown paneling with children's stickers graced the walls.
The first thing I did was to clean all the dirt and debris from between the paneling and the stair treads. I think some of it was remnants from the old carpet.
I then took a safety razor, putty knife and some Goo-Gone, and removed the stickers from the paneling. I also removed the broken trim and nailed down the paneling that was loose on several places.
Now everything was ready for my small budget makeover - PAINT!
Here are the tools I used - painters tape, paint brush and roller and a very important knee pad. The gardeners knee pad made this job a lot more comfortable since you're on your knees a lot for this project.
Out came my primer, and I gave everything a good coat including the paneling. I primed half a step at a time leaving a dry half for traffic up and down the stairs.
It was then time to move on to priming and painting the paneling. Since this makeover was on a small budget, I decided to use left over paint from other rooms in the house. I decided to paint the paneling and cinder block wall descending into the basement with the same grey paint as our living room - Valspar Portland.
Here's the before and after of the paneling.
Quite an improvement I must say.
I originally was told to buy floor paint for the stairs, but a friend told me she just used left over wall paint on her stairs, and they have held up well. I thought I'd give it a try, and not spend more money on buying paint.
The stair treads I painted a dark brown - Toffee Bar by Dutch Boy, (also used in another area of our house) and the risers an off the shelf Dutch Boy bright white (same paint that was used on the doors and trim in the guest bedroom). I painted every other step allowing us access to the basement using the non painted steps. I applied two coats of brown paint to the treads and three coats of white paint to the risers. I allowed these stairs to dry over the weekend making sure they were very dry before we had to walk on them. I then painted the other steps the same way.
The handrail was looking a bit tattered also, so I decided to paint it as well. ( You may notice the paper cups on every other step. These were placed as a reminder which steps were dry and could be stepped on.)
Here's the finished project - what a big improvement for such a small amount of money using left over paint!
View from the top of the stairs.
I washed the upper walls giving them a new fresh glow. I also hung a drop cloth curtain above the stairs to cover up closet storage items (since there is no door for the space). At the bottom of the stairway I used a remnant of carpet left over from the living room to cover up the chipped and pealing floor. I also hung the seascape art that I had in our living room in the Lynden Parsonage.
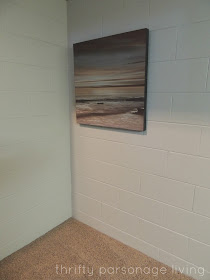
On the paneled wall, I hung a piece of Ikea artwork purchased some time ago at a thrift store. If I remember correctly is was only $5 for and brand new still in the original packaging.
A side by side photos of the before and after.
I'm very happy with the improvement to the stairway
for only a few dollars using what I had on hand - leftover paint.
Have a great day!
Linking to


What an amazing transformation!! It looks so fresh and pretty now. I, too, used just normal house paint on our stair treads. It's the main stairway to our bedrooms, so it's used constantly! It's been a few years now, and the primer is just starting to peek through. A quick touchup and it should be good to go for a few more years! I'm loving all the lovin' up your doing in your new home. Good job! You're going to need a little R & R after the wedding festivities!
ReplyDeleteI love how you did it for nothing...fantastic job! I've pinned it to my Before and After board also!
ReplyDeleteYou do such a quality job. BEAUTIFUL! Thank you for sharing this journey with us!
ReplyDeleteBeen thinking of painting my stairs but was not sure how well they would hold up.
ReplyDeleteWhite always brightens up a tight space and lets your breath. enJOYing seeing your beautiful transformations.
ReplyDelete