Pages

Friday, March 30, 2012

NEST FRAMED ARTWORK - DIY

Over the past week, I've been slowly putting out my spring and Easter decorations.  I decided it would be nice to have a new piece, so last evening I browsed the house for what I had to make something new. 

In the spring time of the year, you think of things coming to life, flowers blooming, trees budding and eggs sitting in a nest ready to hatch.  With that in mind....


 Here's what I came up with.


Here's items I found around the house to make this project.

11 X 14 canvas 
11 X 14 frame (previous used elsewhere in the house)
burlap cloth remnant
drop cloth remnant 
transfer paper
eggs
bird nest
moss

Here's what I did with these items.
Printed off the word Nest and its meaning onto the 
transfer paper.
I then ironed it onto a piece of drop cloth fabric, a remnant left from when I made my drop cloth curtains.

The next step was to staple the fabric to the top 1/4 of the canvas, and the burlap on the lower 3/4 of the canvas.


I left the frayed edge of the burlap exposed because
 I liked the texture it added.

Next it was time to add the embellishments.
I glued eggs into the nest and attached them to the burlap using hot glue.  I then took a little piece of moss and a few small twigs and added them with glue as well.

Here's how it turned out.


Total cost zero dollars because I used what I had!


 For now it's sitting on the cabinet in our dinning room next to the two little chicks that I found at the hardware store this spring.  I'm not sure if I should keep it here or find a wall to hang it on.

Have you made any new projects for spring?  I'd love to see what you've been up to.


I'm linking up this post and joining these parties:

Home Stories A2ZCraft & Tell

Monday, March 26, 2012

LAUNDRY ROOM MAKEOVER {part 2}

Remember how I told you that I've been working on a surprise in my laundry room.  I've been enjoying the subway art that many of you have been creating.  It was while painting my laundry room that an idea sprang to mind.  I wanted a little something more than just plain boring painted walls, and thought: why not create a "subway art wall" or "wall of words".  So that's just what I've done using the words!

Laundry, Wash, Dry, Fold, Repeat

This project was very labor intensive, but was of no cost to me since I used scrapbook paper I already had on hand.  Originally I thought I'd make my own stencil using contact paper and my cricut machine, but because the walls are textured it didn't work wellWhat I did instead was cut out letters using my cricut machine.


Here's how I did it.  Using a level, I positioned the printed out paper as a template with a level.  I then added the words adhering them by spraying the backs with re-positional spay glue.  After I was sure where I wanted the words to stay ( level and not repeating the same words twice in a row.), I glued them to the wall using an inexpensive homemade wall paper glue.  This is a recipe from my mom that we used when I was a child.
 
Homemade Wallpaper Glue Recipe

Boil 1 cup of water,
 in another dish mix 2 tablespoons of cornstarch 
adding a small amount of cold water.
  When the water comes to a boil add the cornstarch mixture. 
 When a consistency of wall paper glue is reached, your glue is ready.  If it becomes to thick just add a little more cold water.


Using a small paint brush, I brushed the glue on the back of each letter.


The best tool to get the letters positioned correctly was a tweezers.


Here's a reminder of what the wall looked like before.


Here's how it looks now.


Sorry about the quality of the photos.
It was very difficult to get good photos of this wall because of poor lighting (no outside light source/windows) and because the room is so small.

The color of the room is a blue gray color,
Clark + Kensington paint from Ace Hardware.

DOVER GRAY

Total cost for the room so far
 paint - free
 letter/words = Zero dollars!

I still have a few more projects that I'm working on for this room.  I hope to share them with you soon.


I'm linking this post and joining these linky parties...


Simply Klassic Home Sunday Linky party
Between Naps on the porch - Metamorphosis Monday 
Nifty Thrifty Tuesday @ Coastal Charm
Making the World Cuter Monday Link up Party 
At Home with K - Terrific Under 10 Tuesday 
Tuesday's Treasures - My Uncommon Slice of Suburbia 
Best DIY Projects of March Linky - Beneath My Heart 
Thrifty Decor Chic - Before and After Party


Tip Junkie handmade projects
Home Stories A2ZTDC Before and After

Thursday, March 22, 2012

LAUNDRY ROOM ARTWORK DIY

Today I had a little time to work on some new art for our laundry room.  I'm trying to makeover this room for the least amount of money, so thrifty Joy shopped the house for items to use.

Here is what I found.

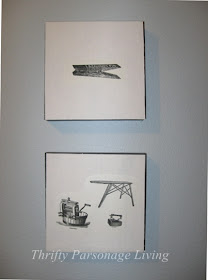
Two canvas framed art purchased at a garage sale last spring for .25 cents each.  When I saw these, I knew I would use them for some art work, but just not sure where.  I had them tucked away with my craft supplies.


I also found a remnant of white duck fabric and
transfer paper left over from a previous project.  

I began the project by taking a sharpie marker and extending the black from the frame sides onto the front of the print.  I did this so there wouldn't be any of the photo showing on the sides of the print.  I also touched up a few nicks on the sides of the frame.


I then cut the duck fabric to the same size as area of the frame.  I found some laundry images at Graphics Fairy blog and printed them off.  Important- make sure to flip the photo image before printing it onto the transfer paper (otherwise your wording will be backwards on your art work).  I then ironed the transfer paper onto the cloth, and then applied it to the canvas using an adhesive spray glue.


Here's a close up of the print.  I like how it has the 
texture of  canvas.


Here they are hanging in the laundry room.

Total cost of this project = 50 cents, plus a few pennies for the leftover fabric and transfer paper.
It's great to get this room all fresh and clean for spring.
In my next post, I'll share the secret project that I've been working on in the room, so make sure to come back and take a peak!


I'm linking this post to

Wednesday, March 21, 2012

LAUNDRY ROOM MAKEOVER {part 1}

I have so many projects going on here at the parsonage. I've been busy doing some spring house cleaning and cleaning/purging in our storage room.  At the same, time I've switched gears from painting the kitchen to painting the laundry room.  The switch came about because of this ....


photo source - Ace Hardware

Ace had a promotional for their paint two weeks ago.  If you brought a coupon into the store, you'd receive a free quart of paint.  You know how I love a good deal; and you can't beat free. You could even pick a paint color of your choice available in the store.  Since my laundry room is very small, I knew it would be the ideal place to use this paint.

Here's how the room has looked for the past 10 + years.


Light house and beach theme wallpaper border with a blue glazed wall below the border. 

I had my work cut out for me!

First - removal of the wallpaper border.

 Why is it that the paper always wants to separate from the vinyl and leave the paper adhered to the wall?

But here's a tip - Place a small amount of fabric softener in a spray bottle and add warm water.  Spray the paper remaining on the wall with this solution allowing it to sit for a few minutes, and then peel the paper off with a putty knife. It works like a charm!


After the wallpaper was removed and walls wiped down, it was time to let the painting begin!


This project isn't finished yet even though I've spent three days working on it.  I've been working on a little surprise that's time consuming but well worth it when you finally have the finished project.  I'll be sharing this surprise project with you in my next post. Have a great day!
 

(I haven't been compensated or asked to promote the paint products on this page.)

Wednesday, March 14, 2012

THRIFT STORE FINDS FOR UNDER TEN DOLLARS

Today my husband had some pastoral visits to make, so I thought it was a great opportunity to ride to along and visit my local thrift store while he did his visits.

One thing I've found about thrift store shopping is that they are putting out new things each day, so the inventory is always changing.  Today I got a few thrifty finds for under ten dollars.

Here's what I found!


My husband has been wanting a cheese slicer for some time.  I found this marble slicer for only 99 cents!  The plates were half price for .49 cents each and the bowls 8 for one dollar. The other items will work great as accents when I make over the kitchen.


Brand new PartyLite candles - $1.99 for a set of 4.
I looked online and found a set for $14 plus shipping and handling changes. I'd say a $12+ is a pretty good savings!


I even found a set of candle holders for FREE!


They'll look pretty on our table for Easter.


Wednesday, March 7, 2012

SPRING IS JUST ARROUND THE CORNER

I've been seeing the signs of spring.  Yesterday I saw my first robin in the yard and my tulips and daffodils are sprouting out of the ground.  With these signs of nature coming to life, it has me thinking about spring projects.  Of course, there's always spring cleaning and house work, but I'm thinking of fun things like the spring wall art I made last year.  I've had so many comments on this DIY that I thought I'd share it with you again.  You can read the post on how I made this artwork by clicking on...


I've been dreaming up some new spring decor for my home!  How about you?  Do you have any great projects in the making?  I'd love to hear about them or see them.  Have a great day!

Saturday, March 3, 2012

DINNING ROOM / KITCHEN MAKEOVER PLANNING

Hi everyone!  I'm glad to be back after an extremely busy week.  Part of being a pastor's wife is to go with my husband on visits to the sick, shut-ins and widows.  We've been doing a lot of visiting lately.  When I finally had some free time to write some posts, my Internet server was down because of heavy snow and rain.

But that doesn't mean that my little old brain hasn't been thinking about projects!  Remember what I told you back in January: one of the projects I'd like to do this year is to makeover my dinning room/kitchen.  Well, in spite of being so busy, I've had a few minutes to gather a few things including paint chips


along with some fabric.


I'd really like a gray or blue-gray color for the walls.  Since gray can be a tricky color, I bought some sample paints and did a small test block.


One of the reasons I'm thinking of gray or blue-gray is that it goes so well with yellow.  Note the yellow tone in our kitchen cabinets.


 Here are a few inspirational photos I've pinned for the room.
The first is from Young House Love.


Love this white kitchen from Flea Market Trixie with just a touch of blue!


Of course there wont be any painting of cabinets since I live in a parsonage and don't own my home, but why not work with the color I have and use it as an accent color?  


Check back for the progress on the update of these rooms. Have a great weekend!