I've been working for sometime along with my dear husband reupholstering our wing back living room chairs.
Here is what we started with ~
two very dated
Pink Velvet Chairs.
First thing I did, after picking out my fabric, was to remove the old fabric.
You can read about it here.
This is how the chair looked after the fabric was removed.
While removing the fabric, I took many photos to help me remember how to put it back together. I also wrote on the back of the old fabric...labeling each piece for reassembling.
They were then placed on the fabric to act as patterns.
Since I'm very thrifty and have a limited budget
to work with,
to work with,
I recycled the zipper and all the piping.
I sewed new piping...
...and created my own knife pleat for the skirt.
Read how I sewed the knife pleat here.
Then the reassembling process could begin. Batting was added to the tops of the arms, and the fabric
stapled in place.
stapled in place.
My husband helped me with all the stapling of the fabric.
After we had the fabric stapled into place, I realized
we had a problem!
we had a problem!
When I decided to add the knife pleat skirt....
all the ones I'd looked at were slipcovers and not upholstered.
Oh...Oh!!!!
How to attach it???
After researching a little I found a blog tutorial by
Centsational Girl on double welted cord.
So I whipped some up only to find that my staples
still showed in the middle of the welting.
The question remained ...
The question remained ...
what to do now?
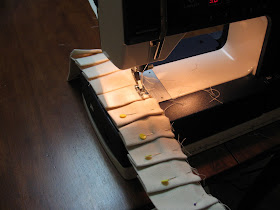
I finally came up with the solution: First, I sewed a one and a half inch strip of cloth on the top of the box pleat right sides together. Next, I folded the strip of fabric over, and top stitched it approximately 1/2" from the fold. Then I folded and ironed the top of the fabric strip (1" now folded over and down the backside). Piping was then stitched into place (see picture below). This left approximately 1/2 inch strip of cloth just below piping on back for staples.
Whala.... the staples are hidden!
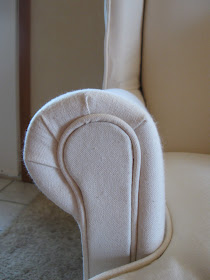
We found the duck fabric hard to work with as an upholstery fabric. The cloth has virtually no stretch making it difficult to work with, so the chair isn't with out mistakes. I love the finished look, however, making it worth the effort. A vast improvement over the pink velvet!
I've added a few accents to the chair - an afghan that I purchased from Goodwill for $ 2.99,
and two pillows that I made.
You can read the tutorials for the nest pillow here and the pocket pillow here.
So what do you think?
I'd say not to bad for a $35 transformation!
One chair done and one more to go!


WOW! That is a beautiful chair! You did a wonderful job! Thanks for sharing. Chris
ReplyDeleteYou and the husband did an awesome job on that chair. Love how it turned out. I have a chair sitting in the family room with the upholstery off waiting for help to get those nail heads out! I just can't get them myself! I hope mine turns out half as good as your piece!
ReplyDeleteThe chair looks fabulous. Love the little pleated skirt also. You did a wonderful job. Hugs, marty
ReplyDeleteGreat Job!!
ReplyDeleteI have to tacle a chair soon and I've scared to!
Beautiful!
ReplyDeleteAmazing. I can't believe you were able to solve the pleat staple problem. Wow, that is just incredible. I love how it turned out. Good luck with the next one.
ReplyDeleteWhat a difference! That skirt had to have been a labor of love. The chair came out beautifully!
ReplyDeleteJust a tip regarding the double welt trim: You can use High temp hot glue along the entire length and a couple staples here & there.
Wow! You guys did a super job!
ReplyDeletethanks for sharing -- gives me a little more courage to begin a similar project (just a different original colour)!
ReplyDeleteWith all the furniture re-dos out there I don't find to many "WOW!" ones anymore, but this is definitely a WOW! You did a GREAT job!
ReplyDeleteI am speechless! You did an amazing job!
ReplyDeleteNot bad?? More like spectacular! I am still working up the nerve to try slipcovering a wing chair, so I think this may be beyond my skill set. Well done!
ReplyDeleteIt looks wonderful, an excellent job!
ReplyDeleteGorgeous! What a transformation. I have been wanting to try this, but really think it is a daunting task. I love the pleated skirt on it. Just amazing and all for $35.
ReplyDeleteThat looks so good! Well done, that kind of project looks so difficult to me. Great work.
ReplyDeleteAmazing! I love the little skirt. What a great addition. Thanks so much for visiting!!
ReplyDeleteA fantastic transformation! You did a wonderful job on this project. The process looks hard and exacting ~ your looks so professional.
ReplyDeleteReally nice stopping by to visit with you!
Kindly, Lorraine
Sandi @ Making It Homey said... I love it. I just finished a chair like yours except mine didn't have the pleats to put on. That really makes it, and you were so creative with your "fix".
ReplyDeleteFantastic job, you are talented! Thanks for sharing at Beyond The Picket Fence.
ReplyDeleteYou did such an amazing job. The chairs are gorgeous. Thanks for linking to the party. I'll be featuring this.
ReplyDeleteWOW!!! Love love love! I'm a new follower and a fellow pastor's wife! I'm sooooo going to do this!! I have a glider that needs new cushions! What a great idea to dis-assemble and use the pieces as patterns!
ReplyDeleteI'm in awe! I would love to learn how to reupholster furniture (its on my to-do list haha), but I have to improve my sewing skills first!
ReplyDeleteAmazing makeover! Excellent job and I must say what talent! Thanks so much for linking this up for Simply Homemaking!
ReplyDeleteMuch Love & Blessings,
ESTHER
Our Simple Country Life
So Great! I am stopping over from The Primp Link Party and love your blog, will follow!
ReplyDeleteWOW! WOW! WOW! Fantastic job.
ReplyDeleteTurned out great! I love the clean lines. I'm also working on a wingback reupholstering. Lots o' work :)
ReplyDeleteYou did a terrific job it really looks great. Your hard work returned a big pay off!
ReplyDeleteThis is great! I have a similar looking recliner that I want to redo- how much fabric did you need?
ReplyDeleteI'm hosting a linky party, the theme is all time favorite post- would love it if you joined in!
-Melissa
www.SerendipityandSpice.blogspot.com
Great job! Getting ready to tackle one but it has tufing on back AND seat.. Check me out!
ReplyDeleteI know this is an old blogpost, so I'm hoping you'll still be willing to comment.... how did you get the cording and front panel on the front of the arms w/out the staples showing? (Does that make sense?)
ReplyDeleteHi Laura,
DeleteTo get the cording to stay without the staples showing, I stapled right next to the piping on the fabric flap -- next to the piping (you can see it in the photo above, where I am sewing the piping) . The front panel is a piece of cardboard with a tack/nail in it. I then just covered the cardboard and used a rubber mallet to pound it into the chair. One thing I learned the hard way - put a few layers of cloth or a rag between the mallet and the front panel while you hammer it. I did not do this the first time and it left black marks from the mallet. I hope this is helpful. Let me know if you have more questions.