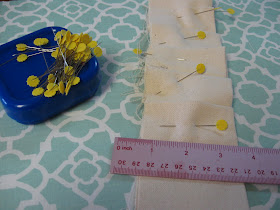
I've decided to add a knife pleat at the bottom of the chairs. It will give the chairs added texture and a tailored look. Some of you may be asking "what is a knife pleat?" According to the definition it's ... a sharply creased narrow pleat, usually folded in the same direction.
If you have basic sewing skills and can sew a straight seam, you can sew knife pleats. Below you'll see instructions along with a few handy tricks for making these pleats.
DIY Knife Pleats
After selecting fabric, you're ready to begin.
1. Measure the distance around the chair that you'll be adding the pleats to. Multiply this measurement by 2, and add 18 inches.
Mine was 106 inches X 2 = 212
+ 18 inches = 230 inches
2. After deciding on the height you'd like your pleat to be, do these calculations. (I wanted mine to be around 2 1/2 inches high.)
Double this and add 1/2 inch seam allowance.
2 1/2 X 2 + 1/2 = 6 inches
Cut your fabric to the needed height and length.

3. Fold the fabric together lengthwise with edges meeting
(wrong sides together).

4. Iron the folded fabric with wrong sides together.

5. Determine what size pleat you'd like (I wanted mine to be between 1 inch to 1 1/2 inch), and begin the folding process.

6. Fold the fabric over to the pleat depth, and pin in place.

7. To make the pleats uniform in size without having to measure each pleat individually, I used a ruler as a guide (1 1/4 inch - pleat).
You could create your own tool for various size pleats using a piece of cardboard, plastic or flat piece of wood cut to the correct size.
Fold the fabric over the ruler and line the folded piece up to meet the edge of the previous pleat. Making sure to pin each pleat.

8. Iron the pleat - if you don't, the pleat will not keep its shape.
While working at my ironing board, I heard this honking noise outside my kitchen window. When I looked out, this is what I saw across the road.... Trumpet Swans! Aren't they beautiful?

9. Once all the pinning and ironing is finished, you're ready to sew. Join the pleats together by sewing a 5/8 inch seam on the unfinished edged of the fabric.


10. Completed sewing....

...waiting to be attached to the chair.

After completing the pleats, I moved on to making the piping.

When I'd finished my sewing for the day, I went to do a little blog reading.
I thought it was interesting(after just sewing my piping) to find a post by Miss Mustard Seed with a tutorial on how to make piping.
For any of you who would like to see an excellent DIY video on making your own custom piping, go to her blog to view this video.
(I'm not being paid to endorse this, but I enjoyed her tutorial).
Linking to...
Hope Studios : Tutorial Tuesday

Thanks for the GREAT tutorial! I am attempting to make my first slipcover and really wanted to do the knife pleats. You make it look easy, so now I am not as intimidated! Thanks so much!!!!!
ReplyDelete